In June this year I wrote an article about: Limit Access to Outlook Web Access, SharePoint Online and OneDrive using Conditional Access App Enforced Restrictions, the article explains how you can use Azure AD Conditional Access to restrict downloading and printing within SharePoint Online/OneDrive and Outlook Web Access (OWA). Within that article we used a global setting, where the App Enforced Restrictions are applicable to all SharePoint and OneDrive sites.
But what if you want more granularity and want to decide on a per SharePoint site basis whether or not these App Enforced Restrictions should be applicable?
Luckily there are options, this article will explain the options possible.
Option 1: Block or limit access to a specific SharePoint site or OneDrive
This option is explained in the following article: Control access from unmanaged devices, the article explains that by using PowerShell you can limit access by using the Set-SPOSite commandlet.
Set-SPOSite -Identity https://<SPO URL>/sites/<name of site or OneDrive account> -ConditionalAccessPolicy AllowLimitedAccess
When using this option, you must remove the global setting, since setting another setting on a subsite only works when its less restrictive. If you would for example set the global policy to “Allow limited, web-only access” and use the Set-SPOSite commandlet to set the Conditional Access Policy for a specific site to “Allow full access from desktop apps, mobile apps, and the web” using the AllowFullAccess parameter, the access will still be limited. If however you would set the Conditional Access Policy for a specific site to “Block Access” using the BlockAccess parameter, the access to the site will be blocked.
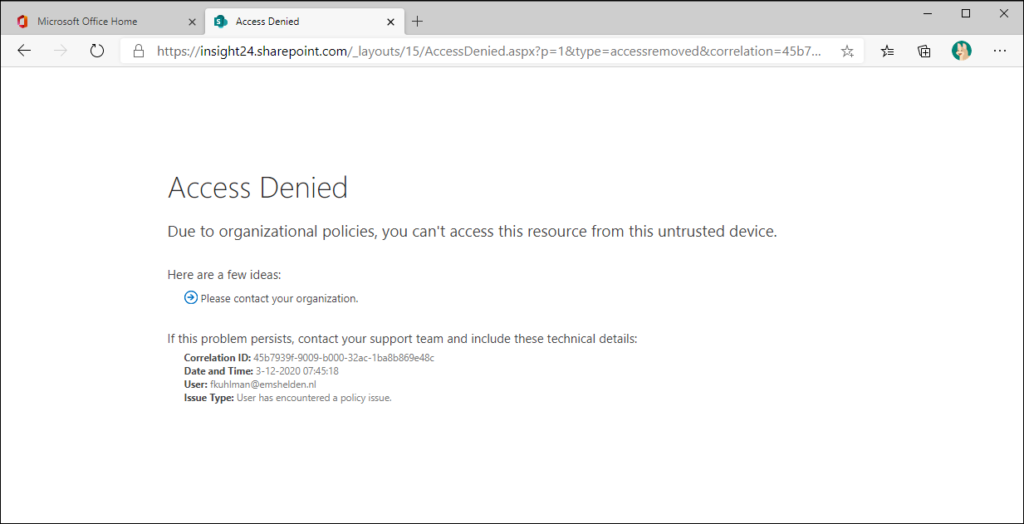
Using this method, has major disadvantages, since you have to execute the necessary PowerShell command for each SharePoint and OneDrive after its created. This can easily be forgotten and can lead to inconsistency
Option 2: Use Sensitivity labels for Containers
There is far more to tell when it comes to Sensitivity labels then explained in this blogpost. For this blogpost we are going to make use of Sensitivity labels for contains, which can be used to define certain settings when creating a Teams or SharePoint environment.
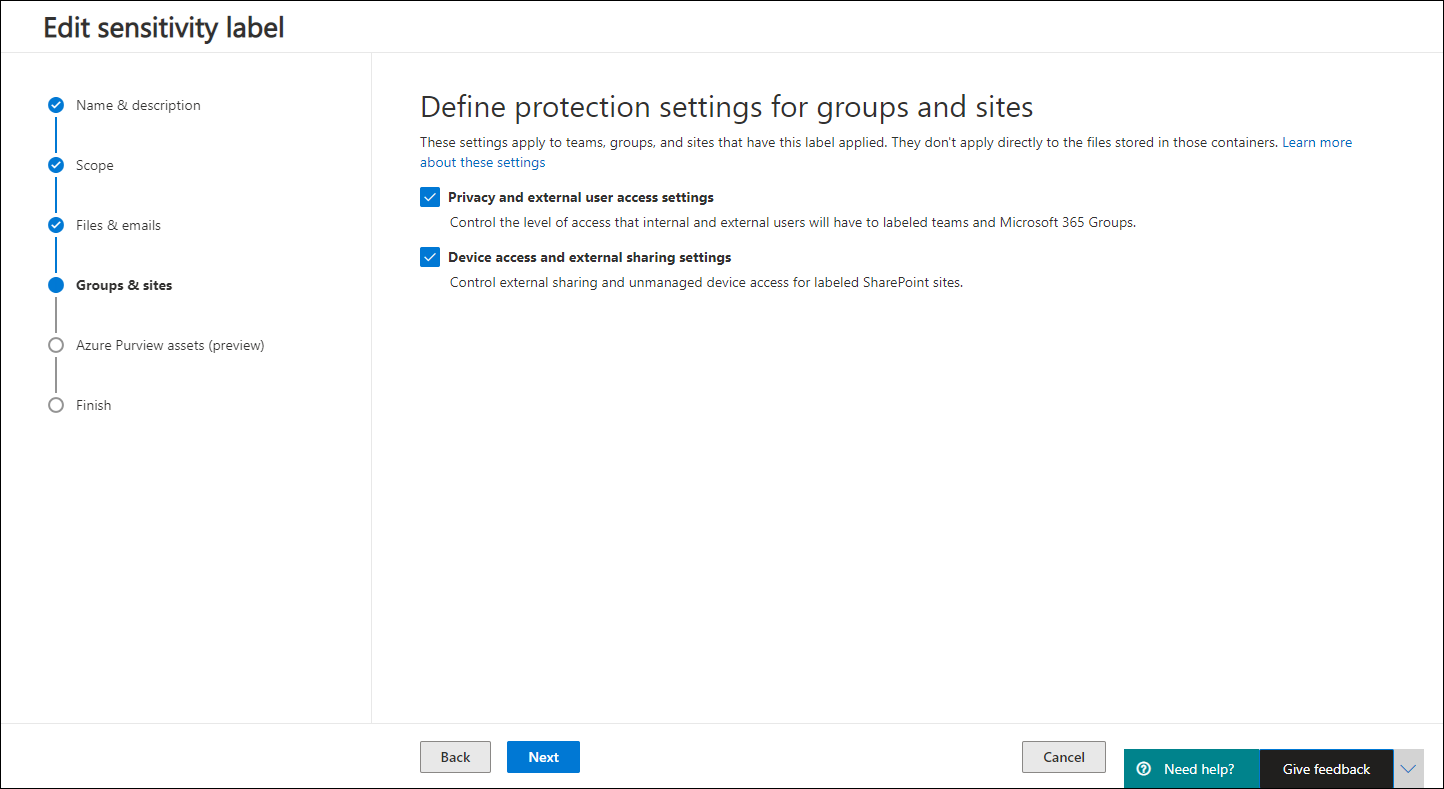
By using sensitivity labels for containers we can control the following settings:
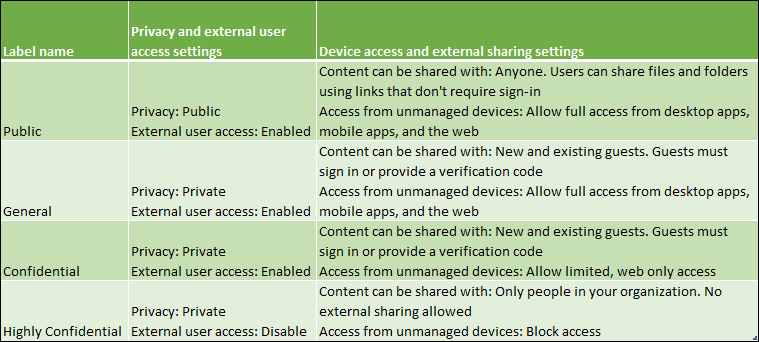
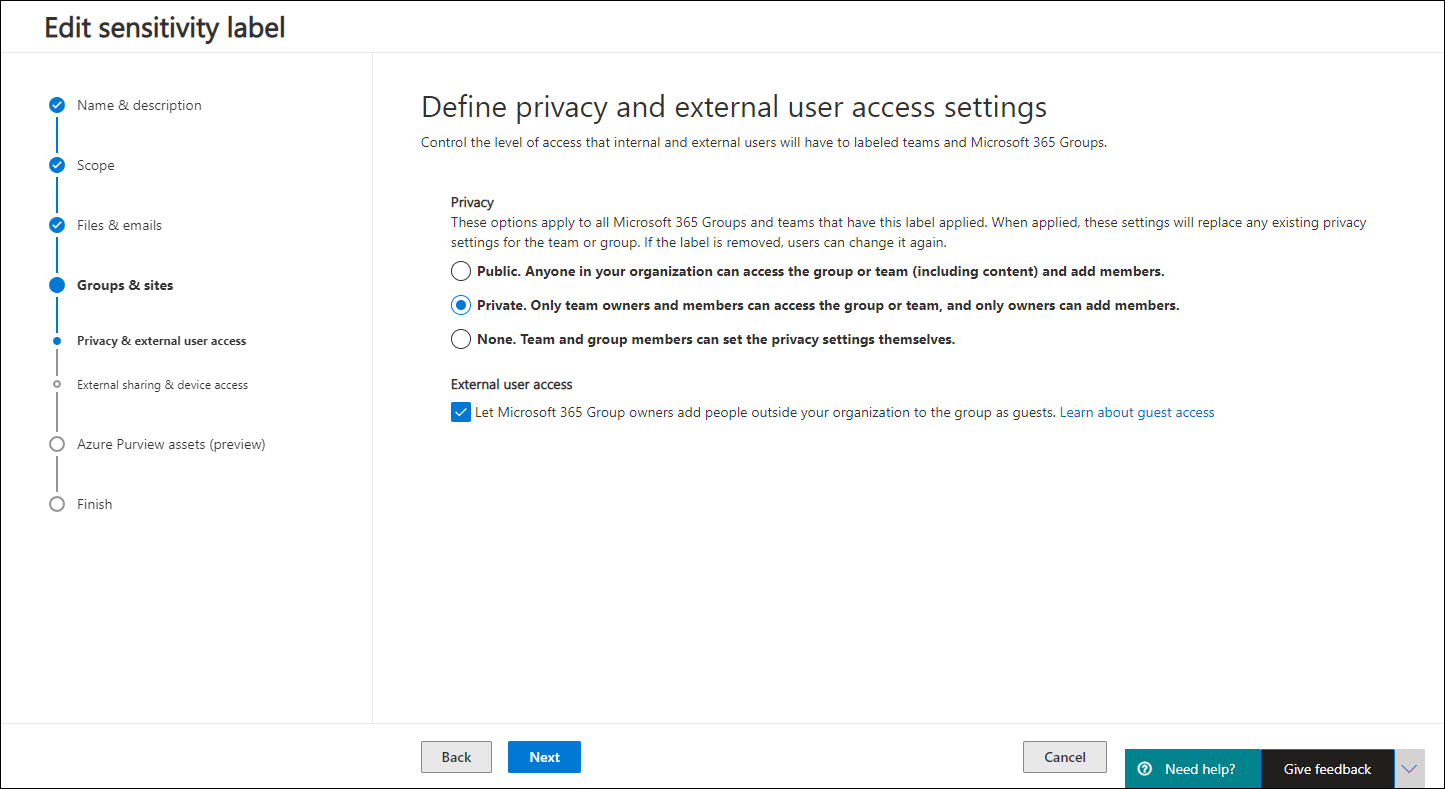
- Privacy and external user access settings
- Use the label to determine whether the site privacy is set to Public, Private or None
- Define whether Microsoft 365 Group owners can add Guest users to the group
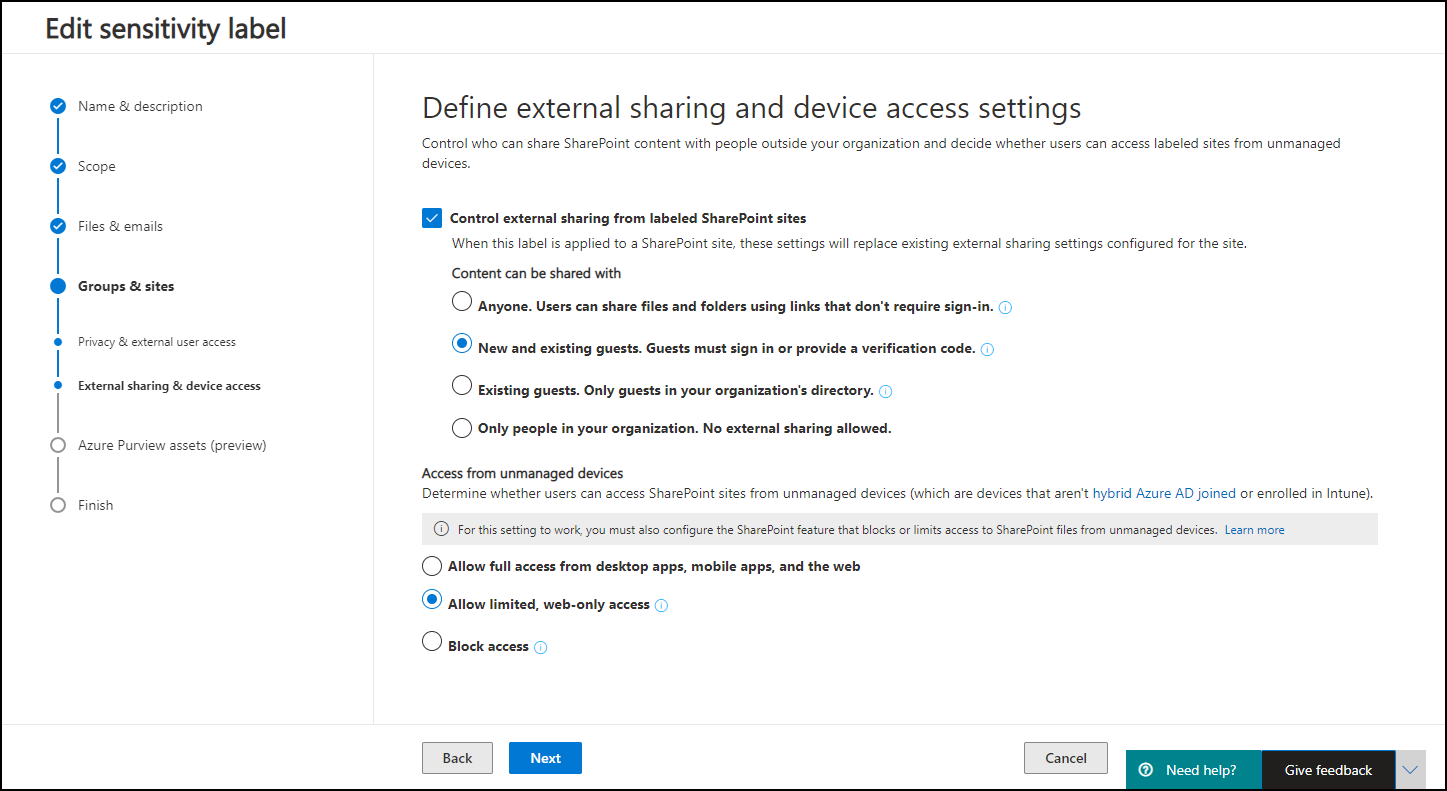
- Device access and external sharing settings
- You can determine if external sharing settings already on the site will be replaced or respected
- You can determine the access from unmanaged devices (same options as on global level – Full, Limited and Block)
So by defining Sensitivity labels for contains we can actually determine the access from unmanaged devices setting that will be used when the Conditional Access policy which enforces the App Enforced Restrictions will be hit.
The settings of this policy is explained in my article: “Conditional Access demystified: My recommended default set of policies“, the name of the policy providing this functionality is called: “CAD006-O365: Session block download on unmanaged device when All users when Browser-v1.0”

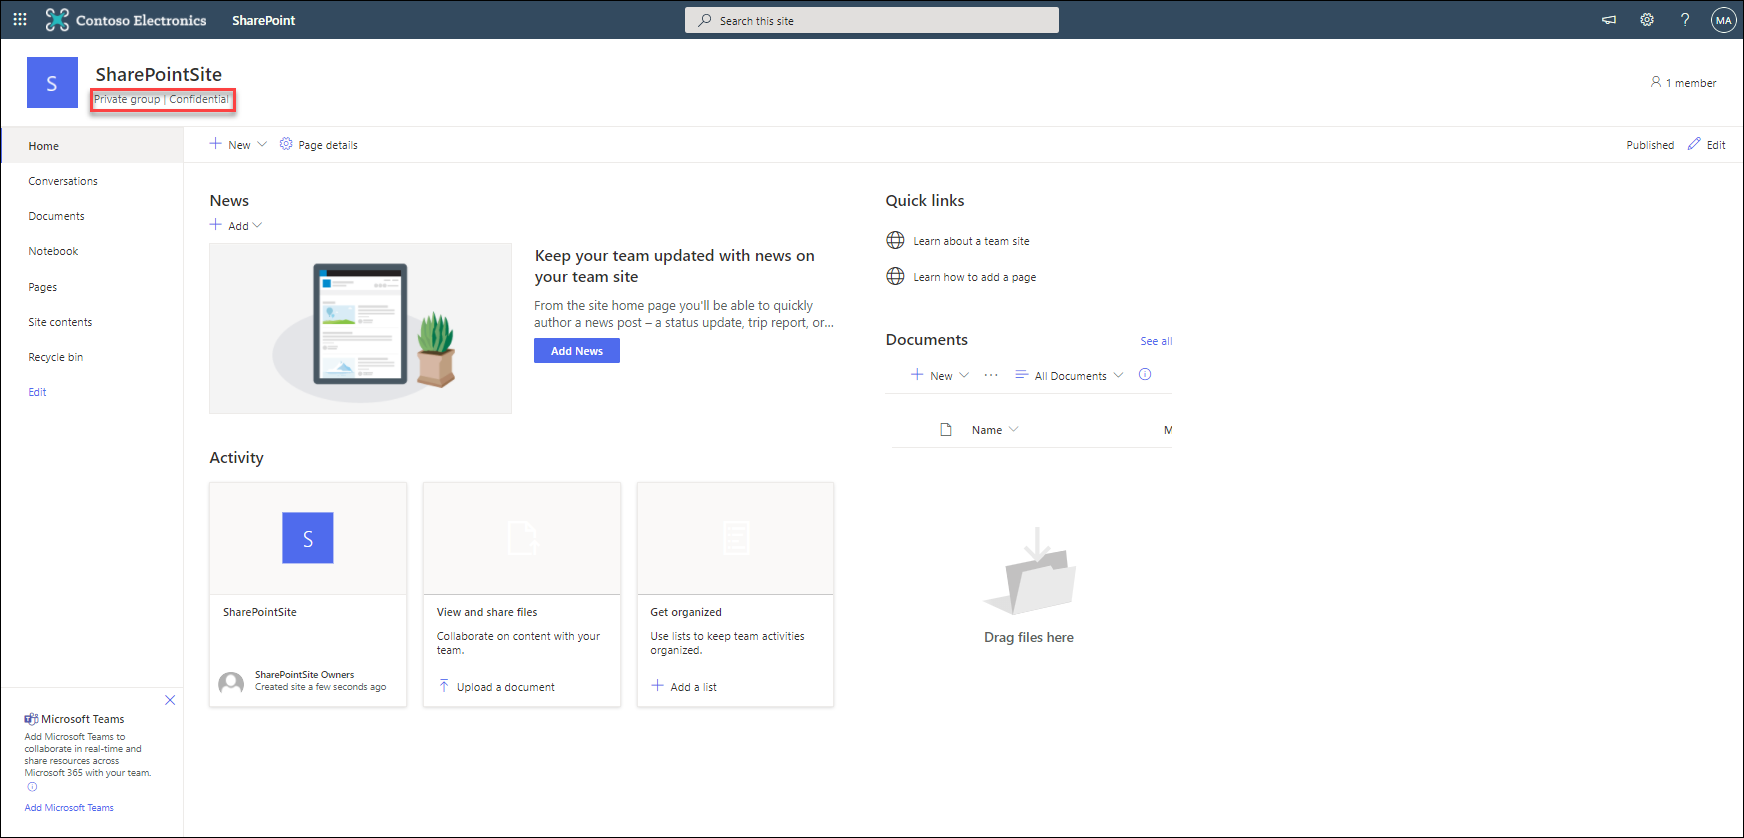
After creating the sensitivity labels you can use them for each new Teams/SharePoint site created, and based on the defined Sensitivity label the correct access from unmanaged devices setting will be applied.
This is not a perfect solution, since it will not solve the issue for all SharePoint sites already created, and you still have to build a solution for OneDrive sites which are created automatically and do not have the option to define a “default” sensitivity label at creation.
Let’s go a little bit more into detail in how to build this from scratch, let’s walk through the steps.
Step 1: Enable sensitivity labels for containers
By default, support for sensitivity labels for containers is not enabled, you can easily determine this by creating a new sensitivity label or by trying to modify an existing one. If the option to select Group & sites is greyed out, you first have to execute some steps to enable this functionality.
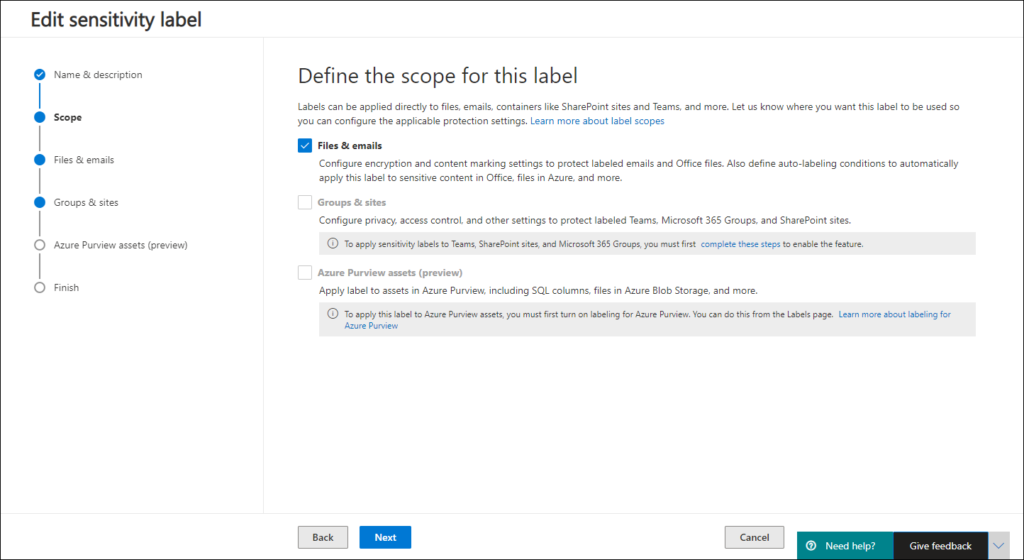
The following procedure is explained in the following article: How to enable sensitivity labels for containers and synchronize labels and one of the first steps is to enable the feature to apply sensitivity labels to groups as explained in this article: Assign sensitivity labels to Microsoft 365 groups in Azure Active Directory
The first thing we need to do, is to import the AzureADPreview module using the import-module AzureADPreview and connect using the Connect-AzureAD commandlet. Make sure that you use the Connect-AzureAD commandlet from the Azure AD Preview module by putting AzureADPreview\ in front of it. Once connected verify if group settings have been set for the Azure AD organization. If no group settings are applied, you’ll get the same error as in the picture below.
![Administrator: Windows PowerSheII
PS C: import - module AzureADPrevieea
PS C: AzureADPreview\Connect-AzureAD
c count
admin@M365xIß2715.onmicrosoft . com
ps Ssetting =
-Value "Group.unified"
- EQ).id
Get - rectory-setting
Cannot dint argument to parameter
. Setting -Id (Get rectory-setting -Property
Environment Tenant Id
Azurecloud 126de6ea-ffb9-445e-
Get -Az ureADDi rectorySett i ng
TenantDomain
Account T
ype
a91f-2d49eaf15ßde M365xIø2715.onmicrosoft . com User
Id (Get-AzureADDirectorySetting I where
Displa
- Property
'It' it is null.
+ Categorylnfo
+ FullyQuaIifiedErrorId
rectory-setting
. In;.'slitüsts: (:) [Get-AzureADDi rectory-setting], PsrsmeterSintingVsIitstionExce;tion
. ,microsoft . D;en . MSC-rs;hSets .C-et](https://www.vansurksum.com/wp-content/uploads/2020/12/image-4.png)
If this is the case you first have to create the settings, as explained in the following article: Azure Active Directory cmdlets for configuring group settings

After performing these steps, you can continue with enabling the Microsoft Information Protection labels functionality as shown in the figure below. You can see that the EnableMIPLabels value is set to True.
![Administrator: Windows PowerSheII
ps C: ssettins -
Get-AzureADDirectorySetting
Name
-Value
ps Ssetting.Va1ues
(Get-AzureADDirectorySetting
-DirectorySetting SSetting
Khere
Displa
Name
nabIeMIPLabeIs
us orn oc e or s IS
E n a bl a nda rd Bloc kedWords
lassificationDescriptions
efauItCIassification
PrefixSuffixNami ngRequ i rement
I owGu estsToaeGnupOwner
IowGuestsToAccessGroups
u estlJsageGuideIineslJrI
roupCreationAI lowedGroupId
Value
False
False
False
True
True
https://guideline.insight24.nl
True
I I owTNddGu est s
sageGuideIineslJrI
lassificationList
Enabl eGroupCreation
Name
nabIeMIPLabeIs
us orn oc e or s IS
SSetting[ " ]
Set - Az u reADDi rectorySetti ng
SSetting.VaIues
Id SSetting.Id
E n a bl a nda kedWords
lassificationDescriptions
efauItCIassification
PrefixSuffixNami ngRequ i rement
I owGu estsToaeGnupOwner
IowGuestsToAccessGroups
u estlJsageGuideIineslJrI
roupCreationAI lowedGroupId
I I owTNddGu est s
sageGuideIineslJrI
lassificationList
Enabl eGroupCreation
Val ue
True
False
False
True
True
https://guideline.insight24.nl
True](https://www.vansurksum.com/wp-content/uploads/2020/12/image-16.png)
After this is done, you must synchronize your sensitivity labels to Azure AD. You can do this by connecting to Security & Compliance PowerShell using the Connect-IPPSSession commandlet

Once finished, the end result should be that you are able to specify the “Groups & Sites” option when modifying an existing Sensitivity label or creating a new one.
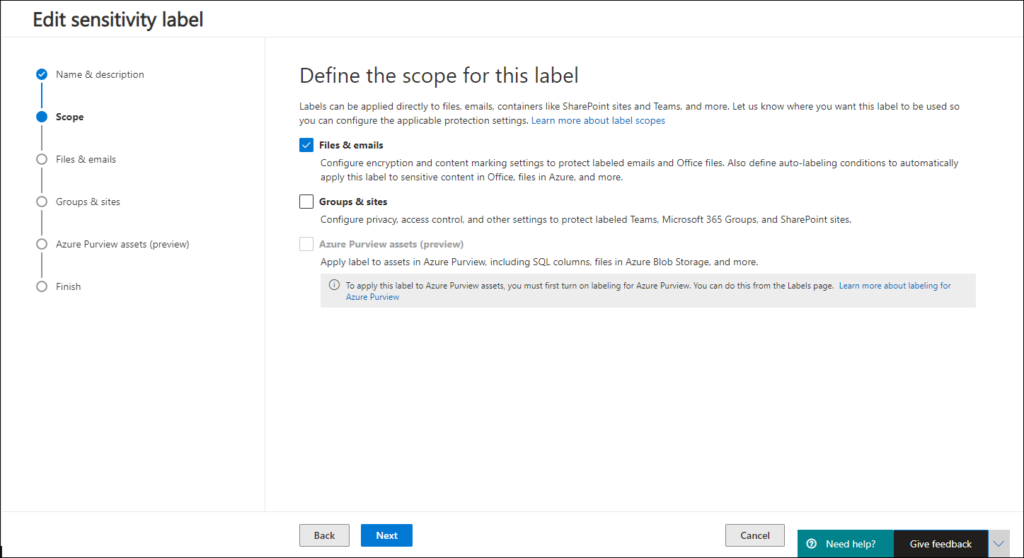
Step 2: Create or Modify your Sensitivity Labels
So, now that we have the functionality available, we can define our settings. In this blogpost I used the following settings
Below is a slideshow of configuring the Groups & Sites setting of my Confidential label
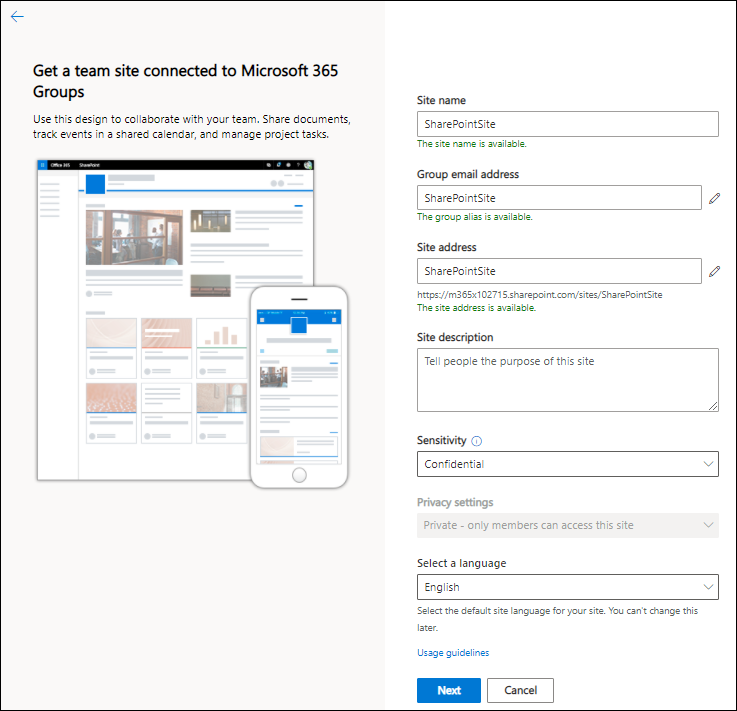
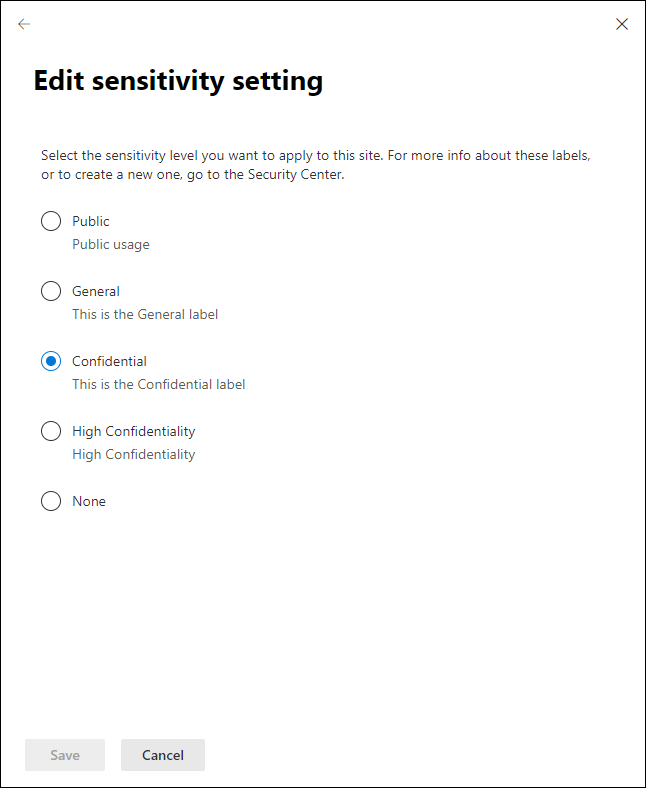
So now that the labels have been created, you will have the Sensitivity label options available when creating SharePoint and Teams environments as detailed in the slideshow below.
Note: It can take a while before you are able to use the sensitivity labels.
How to provide a Sensitivity label to your already existing Teams and SharePoint sites?
So, now that we have configured the sensitivity labels, and can use them to create new Teams or SharePoint sites, how can we handle that our current Teams and SharePoint sites are labelled as well?
For this we need PowerShell, as explained in the following article: Use PowerShell to apply a sensitivity label to multiple sites
Make sure that you have connected to SharePoint Online and to the Security & Compliance Center PowerShell environments by using the Connect-SPOService and Connect-IPPSSession commandlets. Retrieve the GUID of the label that you want to apply to all your existing sites using the Get-Label |ft Name, Guid command. Make sure to put the ID in a variable and enumerate the SharePoint sites by using a generic string representing your tenant. In my case this is “M365x102715”
![Administratar: Windows PowerSheII
[GUIO] (
ps C: Sid
PS Ssites = Get-sposite
PS C: write-output Ssites
-IncludePersonaISite Strue
-Limit all
-Fi Iter
Own er
"url
-like
https
https
https
https
https
https
https
https
https
https
https
https
https
•https
https
https
https
https
https
https
https
https
https
https
https
https
https
https
https
https
https
https
https
https
https
https
https
https
https
https
https
https
https
https
https
https
https
https
https
https
https
https
https
https
https
https
https
https
https
https
https
: / /m36sx1e271S-
my.sharepoint . christiec@m36SxIe271S.onmicroso...
.sharepoint.com/sites/SharePointSite
.sharepoint.com/sites/contosoteam
.sharepoint.com/sites/GIobaIMarketing
.sharepoint.com/sites/SalesAndMarketing
-my.sharepoint.com/personal/admin_m36Sx18271S
. sharepoint . com/sites/Communications
. sharepoint . com/sites/Contoso
-my.sharepoint.com/
-my.sharepoint.com/personal/alexw_m36SxIe271S
.sharepoint.com/sites/GIobaISaIes
.sharepoint.com/sites/Ieadership- connection
.sharepoint.com/sites/operations
.sharepoint.com/sites/salesbestpractices
onmi c rosoft
onmi c rosoft
com
com
admin@m36sx1e2715
admin@m3ssx1e271S
admin@m3ssx1e271S
alexw@m36sx1e271S
admin@m3ssx1e271S
. onmi crosoft . com
. onmi crosoft . com
. onmi c m)soft . com
. onmi crosoft . com
. onmi c m)soft.com
. onmi c m)soft . com
.sharepoint.com/portals/hub
. sharepoint . com/sites/askhr
.sharepoint.com/
. sharepoi nt . com/sites/parentscfcontoso
.sharepoint.com/sites/ReviewCenterForRetention
.sharepoint.com/sites/ThePerspective
.sharepoint.com/portals/Community
.sharepoint.com/sites'CommerciaILending
.sharepoint.com/sites/newemployeeonboarding
.sharepoint.com/sites/benefits
.sharepoint.com/sites/ceoconnection
.sharepoint.com/sites/Contos03rand
.sharepoint.com/sites/SOCTeam
.sharepoint.com/sites/Ieadership
.sharepoint.com/sites/contosolife
.sharepoint.com/sites/ContosoWorks
.sharepoint.com/sites/ContosoNews
. sharepoi nt . com/sites/FlySafeConference
.sharepoint.com/search
.sharepoint.com/sites/safety
.sharepoint.com/sites/Mark8ProiectTeam
.sharepoint.com/sites/Salesplanning
.sharepoint.com/sites/lJSSaIes
- my . s h a repoi nt . com/persona I/ iohannaI_m36Sx1827 IS_onmi c rosoft.com
.sharepoint.com/sites/give
. sharepoint . com/sites/Retail
. sharepoi nt . com/sites/droneproducttraining
com
.sharepoint.com/sites/RetaiIOperations
.sharepoint.com/sites/pm)ductsupport
.sharepoint.com/sites'Office36Sadoption
.sharepoint.com/sites'DigitalInitiativePubIicReIations
Iynner@m36Sx18271S.onmicrosoft . com
diegos@m36SxIe271S.onmicm3soft . com
admin@m36Sx18271S . onmi c m)soft . com
adelev@m36SxIe271S.onmicrosoft . com
pradeepg@m36SxIg271S . onmi
admin@m36Sx18271S . onmi c m)soft . com
irvins@m36SxIe271S.onmicrosoft.com
debrab@m36SxIg271S . onmi c m)soft.com
admin@m36SxIg271S . onmi c m)soft . com
ionis@m36SxIg271S . onmi c m)soft.com
alland@m36SxIg271S . onmi c m)soft.com
pattif@m36SxIg271S . onmicm)soft.com
nestorv@m36Sx18271S.onmicrosoft..
meganb@m36SxIe271S.onmicrosoft . com
miriamg@m36SxIg271S . onmi cm)soft
admin@m36SxIg271S . onmi c m)soft.com
admin@m36SxIg271S . onmi c m)soft.com
Ieeg@m36SxIg271S . onmi c m)soft . com
admin@m36Sx1827 IS . onmi crosoft . com
Iidiah@m36SxIe271S.onmicrosoft . com
gradya@m36Sx18271S.onmicrosoft . com
iohannaI@m36SxIe271S.onmicrosof...
admin@m36Sx18271S . onmi c m)soft . com
admin@m36Sx18271S.onmicrosoft . com
isaiahI@m36SxIg271S.onmicrosoft...
admin@m36SxIg271S . onmi c m)soft.com
admin@m36Sx18271S . onmi c m)soft . com](https://www.vansurksum.com/wp-content/uploads/2020/12/image-12.png)
Now that we have enumerated all SharePoint sites (including OneDrive sites) we can apply the label we want, In my case I have chosen to use the Confidential label, so that by default I provide limited access and can use the GUI to make exceptions.
![Administratar: Windows PowerSheII
ForEach-Object {Set- SPC'Tenant
ps ssites
. The
+ Ssites I ForEech-Object {Set-SPOTenent S_.url -SensitivityLEbeI
S Id}
Cetegorylnfo
+ FullyQuEIifiedErrorId
PS C:
: NotSpecified: (:) [Set -SPOT enant], ServerException
. nicrosoft: .Sh±rePoint: . Client , nicrosoft:](https://www.vansurksum.com/wp-content/uploads/2020/12/image-14.png)
Apparently, you cannot set a sensitivity label on the MySite host, which is the https://m365x102715-my.sharepoint.com/ URL in my case. But this can be ignored.
The end result is that all the SharePoint sites, and OneDrive sites will have the Confidential sensitivity label applied on the container level
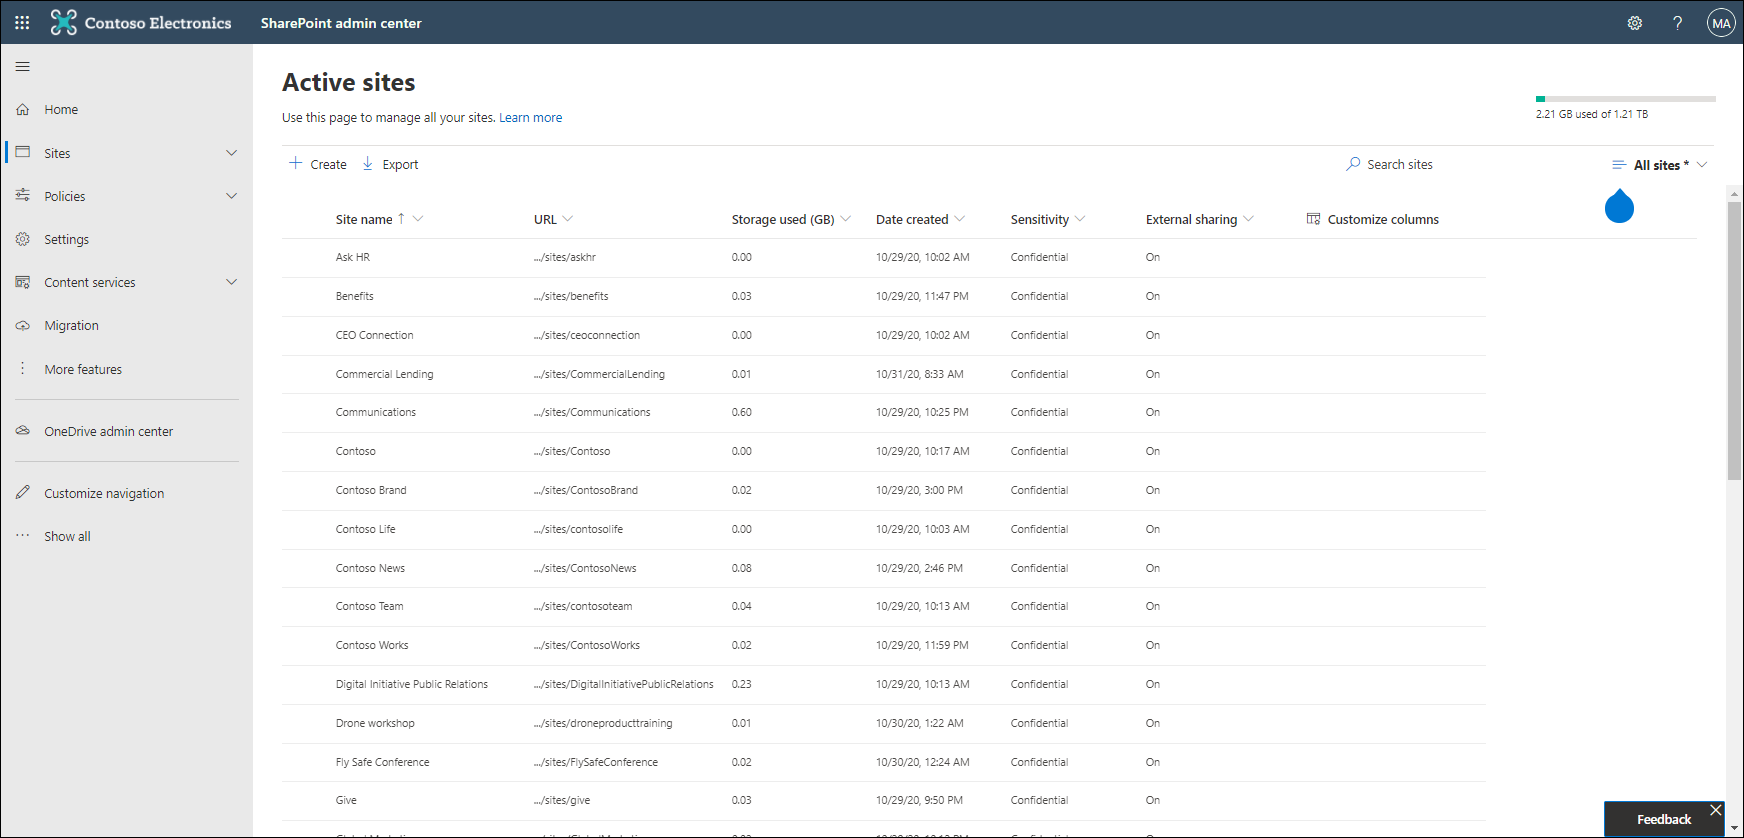
Keep in mind though that you have to create a procedure from now on to make sure that the Sensitivity label gets applied to newly created OneDrive sites. Unfortunately I haven’t found a way yet to set a default Sensitivity label for newly created OneDrive sites.
Conclusion
By using Sensitivity labels, we can provide more granularity when it comes to restricting access to SharePoint sites when leveraging the App Enforced Restrictions Conditional Access policy.
It’s pity though that we cannot set a default sensitivity label for newly created OneDrive sites, hopefully this features will show up somewhere in the future. I created a Uservoice item for this which can be found here: https://sharepoint.uservoice.com/forums/330318-sharepoint-administration/suggestions/42121057-provide-option-to-define-default-sensitivity-label
References
Control access from unmanaged devices – https://docs.microsoft.com/en-us/sharepoint/control-access-from-unmanaged-devices
Use sensitivity labels to protect content in Microsoft Teams, Microsoft 365 groups, and SharePoint sites – https://docs.microsoft.com/en-us/microsoft-365/compliance/sensitivity-labels-teams-groups-sites?view=o365-worldwide#enable-this-preview-and-synchronize-labels
Assign sensitivity labels to Microsoft 365 groups in Azure Active Directory – https://docs.microsoft.com/en-us/azure/active-directory/enterprise-users/groups-assign-sensitivity-labels
Use sensitivity labels to protect content in Microsoft Teams, Microsoft 365 groups, and SharePoint sites – https://docs.microsoft.com/en-us/microsoft-365/compliance/sensitivity-labels-teams-groups-sites?view=o365-worldwide



3 thoughts on “Defining more granularity for your Conditional Access App Enforced Restrictions using Sensitivity Labels”