Measuring your managed systems against a baseline has been around for a while, in Microsoft Endpoint Configuration Manager(MECM)/ConfigMgr we can already use one or more Configuration Items combined in a Configuration Baseline to measure and remediate clients against an imported or self created baseline. You can measure for example if the Windows Firewall is enabled and configured as required, and if not enable it and remediate it’s configuration. In my opinion this functionality provided by ConfigMgr has always been better than using Group Policies, since by using ConfigMgr Configuration Baselines, we could set certain settings on our managed devices but also centrally monitor whether those settings were applied as well, and it also works on non Active Directory domain joined machines. Microsoft and other vendors even supplied configuration packs, which were a set of configuration items and baselines which ConfigMgr admins could import and use in their ConfigMgr environment. As far as I experience configuration packs are hardly used and not actively developed anymore.
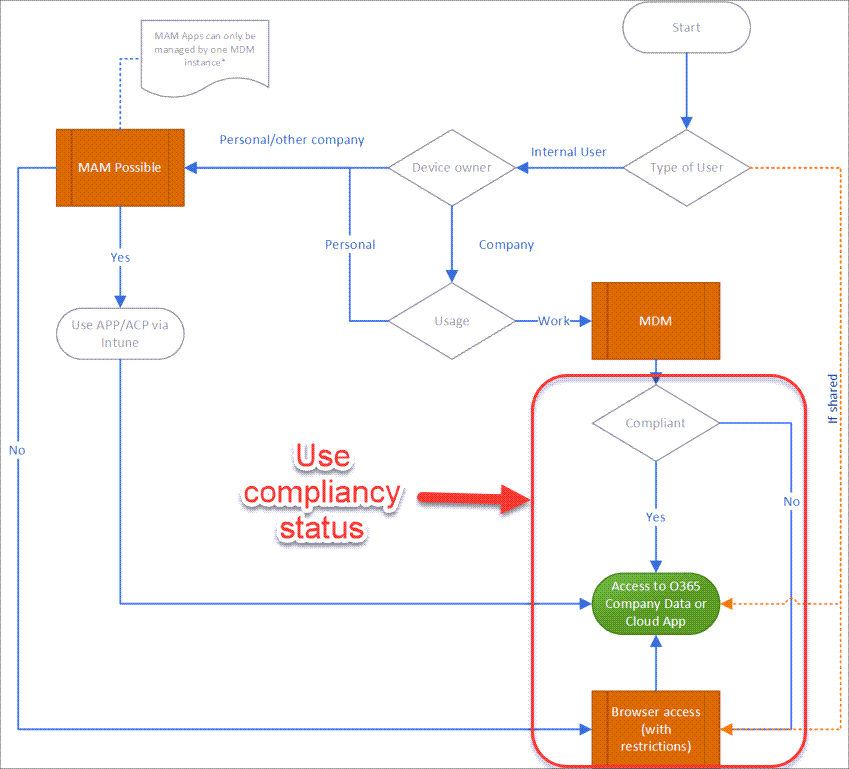
Within Conditional Access we can use the compliance status of a device as a condition or grant control for accessing Cloud applications. We define when a device is considered compliant in Microsoft Endpoint Manager(MEM)/Intune or in Microsoft Endpoint Configuration Manager(MECM)/ConfigMgr. In MEM we can use compliance policies to measure our Mobile Device Management(MDM) clients against the rules set in the policy. The outcome is that the device is either Compliant, meaning that it meets the ruleset defined in the compliance policy, or the device is not compliant meaning that the device doesn’t meet the ruleset defined in the compliance policy. Devices which are not managed by MEM can’t meet the ruleset and therefore are always considered not compliant. Non compliant devices in Conditional Access consist of all non-managed devices plus the managed devices which don’t meet the settings in the compliance policy.
For some platforms (Windows 10 excluded) we also have options to remediate settings besides reporting on non compliance only. With remediation support we can make clients compliant once detected that they don’t meet the ruleset. If remediation is supported, you don’t have to create a configuration setting, enforcing the setting which you want to measure with the compliance policy.
During normal operation of a device, compliancy is checked every 8 hours or if the user clicks on “Check access” from the Company portal. This is important to realize, since the chance that a device becomes non-compliant right after someone modified a setting you want to enforce is minimal and it can take a while for non compliance is detected.
This blogpost will focus on compliance policies for Windows 10 devices, but you can use compliance policies for other platforms, like Android, iOS/iPadOS and macOS as well. The principles and usage of the compliancy policies are the same.
The following topics are covered:
- Generic compliance policy configuration
- Explaining the Windows 10 Compliance policy
- Assigning to user or device groups
- Using compliance state in your Conditional Access policies
- Designing your Compliance Policies
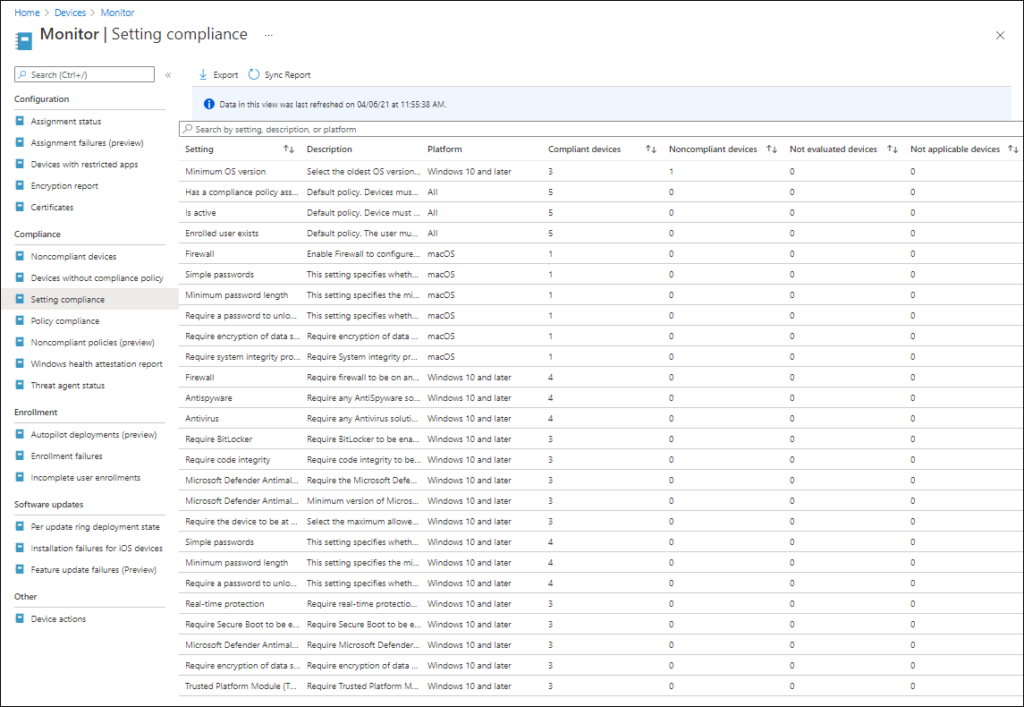
- Monitoring your compliance policies
- Conclusion
- References
Disclaimer: This post reflects the status of Compliance Policy settings as of April 6, 2021. Functionality may and will change, even right after this post has been published.
Generic compliance policy configuration
There are some generic compliance policy settings which you can configure for your tenant, these settings are configured centrally and can be used by different compliance policies and are valid for across supported platforms. You can find these generic settings by going to Devices and by clicking on Compliance Policies under the Policy section.
Notifications
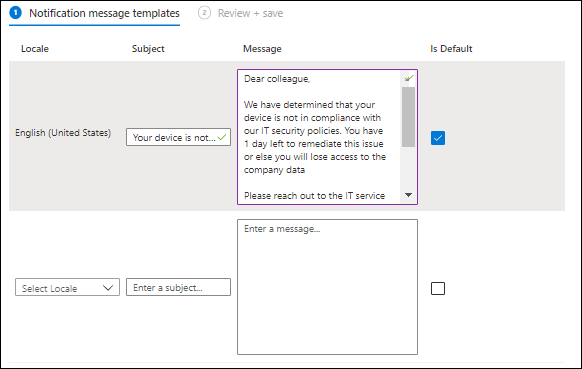
Under notifications you define templates for email messages which you can use to notify the users of a device which has become non-compliant by email. You specify the usage of the notification template in the “Actions for noncompliance” section of the compliance policy. By creating more than one template you can change the content of the message to specify the amount of days before the device will be marked as non-compliant or be specific about why the device fell out of compliance.
You can specify the following items to include in the email when creating a notification message.
- Company logo in the email header.
- Company name in the email footer
- Contact information in the email footer
- Link to the Company Portal Website
The options you can enable are depending on whether you supplied them in your company portal configuration, see the following article on how to configure this information: How to customize the Intune Company Portal apps, Company Portal website, and Intune app
The message itself can be created in multiple languages, so that you can customize the message to the user receiving it depending on their configured language. You can also choose one Locale as default, which is used in case the user locale of the user is not specified.
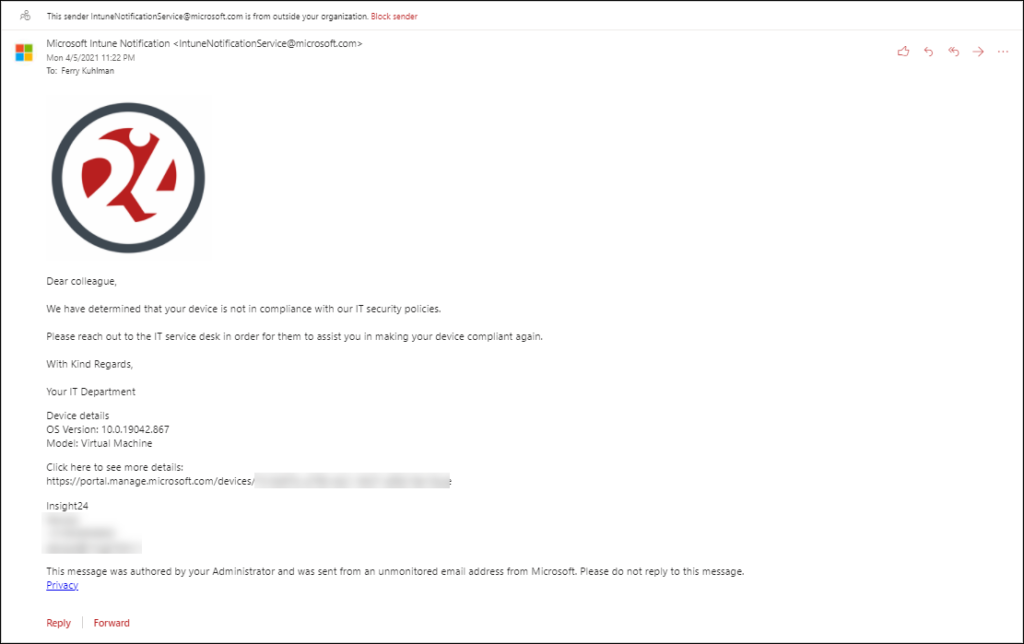
Once determined non-compliant an email is sent from Microsoft Intune Notification (IntuneNotificationService@microsoft.com) containing the information specified in the notification template.
Retire Noncompliant Devices
If specified in the Compliance policy that a non-compliant device must be retired, it will end up in the Retire Noncompliant Devices section. From there you can decide what to do with the device(s). You have the option to “really” retire the device, removing it from Microsoft Endpoint Manager, or to clear the retire device state removing it from the Retire Noncompliant Devices view.
Locations
Locations are available only for the Android device administrator platform, and therefore I will not go into further detail on what they do. See the following article if you want to know more: Bind Android devices by network location in Microsoft Intune
Compliance policy settings
These settings are generic and define the default behavior of the compliance policy. Here you can define what happens with a device which has no compliance policy assigned, by default this device will be marked as “Not Compliant”. You can also configure the usage of “Enhanced jailbreak detection” which is only supported on iOS/iPadOS and uses location services to more regularly check for a jailbreak.
You can also specify the Compliance status validity period, which is set to 30 days by default. The setting specifies the time period in which devices must report the status for all received compliance policies. Devices that do not return status within this time period will be treated as noncompliant, you can configure a period between 1 and 120 days.

Explaining the Windows 10 Compliance policy
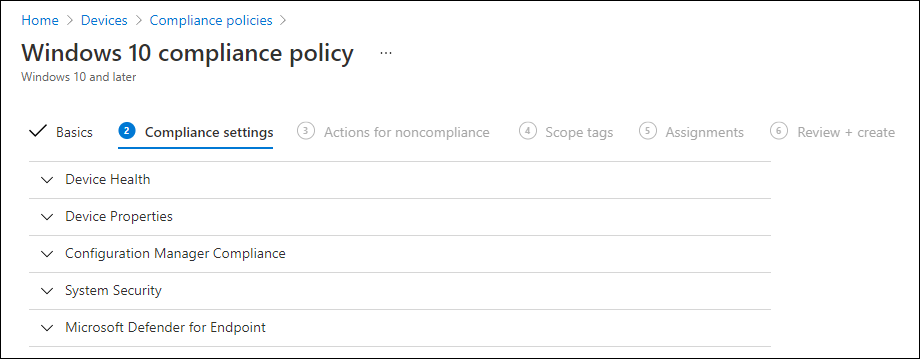
A Windows 10 compliance policy currently consists of the following sections:
- Device Health
- Device Properties
- Configuration Manager Compliance
- System Security
- Microsoft Defender for Endpoint
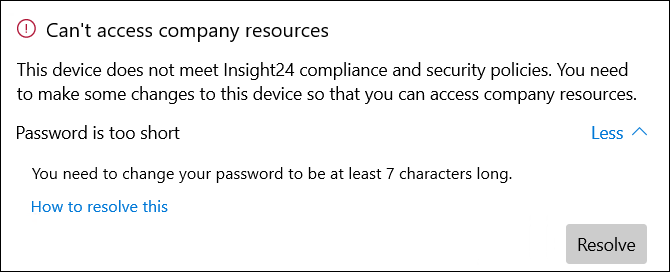
For Windows 10, there are no compliance policy settings which remediate. If the device doesn’t meet the settings in the compliance policy it will be “quarantined” which means that it will report as non-compliant (and access can be denied if you configured the correct Conditional Access rues) and the user will be notified of this non-compliancy in the Company Portal app.
From the company portal app the user has the option to click on “Resolve” which opens up the configuration panel for the item which is not compliant. Optionally we can also decide to notify the user per email of this non-compliance.
Let’s go into a little bit more detail on which settings can be configured per section below.
Device Health
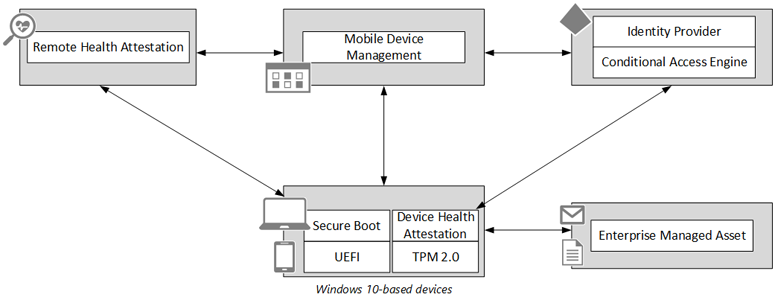
In this section you can configure Windows Health Attestation Service evaluation rules. With Windows Health Attestation you can protect, control and report on the security status of the Windows 10 device. By doing so, you can protect the device from low-level rootkits and bootkits using hardware technologies such as Unified Extensible Firmware Interface (UEFI) secure boot.
Windows Health Attestation Service uses the Device Health Attestation(DHA) which measures boot data very early in the Windows boot process. This boot data which is protected by the Trusted Platform Module (TPM) is then sent to a remote service (the Remote Health Attestation) which performs a series of checks on the measurement. These checks validate boot state, like secure boot and the state of the components that manage security, like BitLocker, Device Guard. The Remote Health Attestation services communicates directly with the MDM service providing a health report about the device.
This is a very simplistic explanation of what Device Health does, if you want to read more in depth about how this works I suggest that you read the following article: Control the health of Windows 10-based devices
Within a Windows 10 compliance policy you can check for the following Windows Health Attestation Service evaluation rules:
- Require BitLocker
- Required Secure Boot to be enabled on the device
- Required code integrity
We must be aware that these checks are performed at boot time, which could cause some challenges on newly enrolled devices. If a device which doesn’t have BitLocker enabled at time of boot, gets enrolled in MEM and there is also a compliance policy in place which required BitLocker, the status of BitLocker based on the measured boot will be reported as not enabled, since at time of boot BitLocker was not enabled. There are also some situation where BitLocker is temporary suspended, for example during an OS upgrade and also in this case the DHA can report that BitLocker is not enabled at time of boot, even though after the OS upgrade is finished and BitLocker is unsuspended again.
The only way to have the device report compliant on Require BitLocker as part of Device Health is to have the device rebooted, after which the measurement can report that BitLocker is indeed enabled. In some scenario’s a second reboot is needed, which must be initiated by the user on the device. If you do not want to rely on this ” user dependency” you might use the ” Encryption of data storage on the device” option in the System Security section to check if the data on the device is encrypted only.
Secure Boot is a UEFI firmware-based feature, which allows for the signing and verification of critical boot files and drivers at boot time. Secure Boot checks signature values of the Windows Boot Manager, BCD store, Windows OS loader file, and other boot critical DLLs at boot time before the system is allowed to fully boot into a usable operating system by using policies that are defined by the OEM at build time. Secure Boot prevents many types of boot-based rootkit, malware, and other security-related attacks against the Windows platform.
Code Integrity is a feature of Device Guard that ensures only drivers, executables, and DLLs that comply with the Device Guard Code Integrity policy are allowed to run.
Device Properties
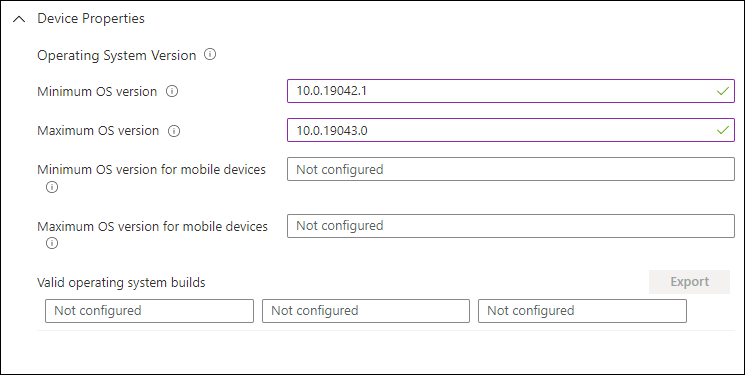
In the Device Properties section of the Windows 10 compliance policy you can define the minimum and maximum versions of the Windows 10 Operating System that you want to support in your compliance policy. The version must be written down in the following notation: major.minor.build.revision.
For windows 10 major is always 10, minor is 0 and the build represents the version of the feature update. Revision is the number which corresponds to the installed update. You can find all information about what’s in each version in the Windows 10 Update History. You can find an overview of the different supported windows 10 versions at the following link: Windows 10 – release information
In the Device health section of the Windows 10 compliance policy the following settings are available:
- Minimum OS version
- Maximum OS version
- Minimum OS version for mobile devices
- Maximum OS version for mobile devices
- Valid Operating system builds
To configure Windows 10 minimum and maximum version you need to use the Minimum OS version and Maximum OS version fields. The Minimum OS version for mobile devices and Maximum version for mobile devices still refer to Windows 10 Mobile, which is not actively used anymore.
For example if you only want to allow Windows 10 20H2 you should specify 10.0.19042.1 as the minimum and 10.0.19043.0 as the maximum version which is the first revision of 21H1 which is not the revision released once generally available. Keep in mind that in the end the policy evaluates the string against the current version of the Operating System. You can also use 10.0.19042 for example and leave out the revision number.
If you don’t specify the maximum version and Windows 10 21H1 version would be released, you would also support this version in your compliance policy as well.
If you want to support multiple builds of different Windows 10 versions you might want to use the “valid operating system builds” functionality, where you can define multiple Windows 10 versions with minimum and maximum revisions. For example in the figure below, we only support Windows 10 20H1 and 20H2 with the cumulative update released in January 2021 installed and higher. If we would specify Minimum and Maximum OS version as mentioned above, we wouldn’t be able to create this specific requirement.
Configuration Manager Compliance
If you use Co-Management (meaning that the device is hybrid managed using Microsoft Endpoint Configuration Manager/ConfigMgr and Microsoft Endpoint Manager/Intune) you can use the ConfigMgr compliance functionality in your compliance policy. When set to required, the device must meet the compliance of all defined configuration items in the deployed configuration baseline(s) in order to be considered compliant.
System Security
The System Security sections contains a couple of subsections:
- Password
- Encryption
- Device Security
- Defender
Password
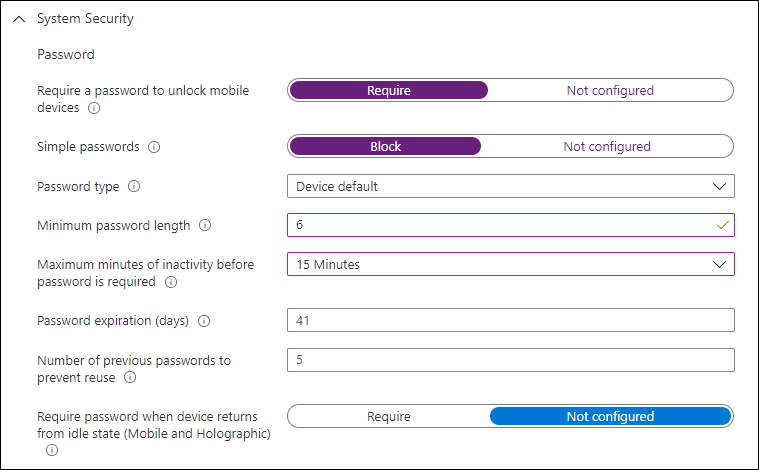
In the password subsection you can specify the requirements related to passwords on the device, on a Windows 10 Desktop OS this refers to the Windows Hello Convenience PIN or Windows Hello for Business settings.
You can specify whether it’s required to unlock the device using a password in order to be considered compliant. Even though the text implies mobile devices, this setting is effective for Windows 10 desktop versions. You can specify whether simple passwords like 1234 or 1111 are allowed, and whether a numeric or alphanumeric PIN can be used. When using Device default, you can use both. You can also specify the minimum password length, the minutes of inactivity before the password is required and whether passwords expire with corresponding expiration in days.
For a complete overview and explanation of all the settings in this password subsection see: Password
Keep in mind that these settings are only checked, and not enforced. So for example, if you allow as a minimum a 4 digit numeric PIN on your device using a device restriction configuration profile, but set the minimum password length in the compliance policy to 6 and the user has a 4 digit pin configured, the device will be considered non-compliant.
Encryption
This setting checks for the presence of encryption on the device at the OS drive level. When using this setting, you will be compliant if the OS reports that encryption is enabled. The Require BitLocker setting, discussed earlier is more robust though, but has some caveats.
Device Security
The settings in the device security subsection can be used to check on whether some critical functionality is enabled. Here you can check on whether the following items are enabled:
- Firewall, which requires the firewall to be turned on and monitoring
- Trusted Platform Module (TPM), which requires a TPM module to be present
- Antivirus, which requires an antivirus product to be present and if non Microsoft to be registered with Windows Security Center
- Antispyware, which requires an antispyware product to be present and if non Microsoft to be registered with Windows Security Center
Defender
The settings for the defender subsection are only applicable to Windows 10 desktop. The following settings can be configured:
- Microsoft Defender Antimalware, when set to require the policy checks if the Defender Antimalware service is enabled.
- Microsoft Defender Antimalware minimum version, allows you to configure a minimum version to be present before the device can be considered compliant.
- Microsoft Defender Antimalware security intelligence up-to-date, does exactly as it implies – it checks whether the security intelligence is up to date and not outdated.
- Real-time protection verifies whether real-time protection is enabled.
You can figure out the minimum version of the Microsoft Defender Antimalware version to use on your own device by opening the Microsoft Defender Security Center app, select the Settings icon, and then select About. The version number is listed under Antimalware Client Version.
You can also find the latest version on the Microsoft Update Catalog by searching for Microsoft Defender Antivirus. There is also a reference to KB4052623 which should mention the latest available version, but in my testing this wasn’t the case. (My version at time of writing is 4.18.2102.4 and the version reported on the KB4052623 page is 4.18.2101.9). I also found the following link giving some more release information Monthly platform and engine versions.
Microsoft Defender for Endpoint
When configured you can use the risk assessment coming from Microsoft Defender for Endpoint as a condition for the compliance. By default, this setting is set to Not Configured, the following other options are available:
- Clear -This option is the most secure, as the device can’t have any threats. If the device is detected as having any level of threats, it’s evaluated as non-compliant.
- Low – The device is evaluated as compliant if only low-level threats are present. Anything higher puts the device in a non-compliant status.
- Medium – The device is evaluated as compliant if existing threats on the device are low or medium level. If the device is detected to have high-level threats, it’s determined to be non-compliant.
- High – This option is the least secure, and allows all threat levels. It may be useful if you’re using this solution only for reporting purposes.
Actions for noncompliance
Besides the “measurement points” in the compliance policy, you also can define what needs to be done if the device is found non-compliant.
Mark device noncompliant
You can specify when to mark the device as noncompliant, by default this is set to immediately (value 0) which means that if the device is scanned for compliance and it doesn’t meet the requirements as defined in the compliance policy the device will be reported as non-compliant immediately. You can specify a timeframe between 1 and 365 days. If the device is measured as non-compliant but not marked yet, it’s considered “in grace period”. That is the time you allow your end user to remediate the issue themselves, you can notify the end users and selected groups of this non compliancy using notifications.
Send email to end user
You can decide to send an email to the end user using one of the predefined notification templates. You can even use multiple points in time to send emails based on different templates making users aware of how much time they have left to bring their device back to a compliant state before access will be blocked. In the screenshot above, we send out an email immediately to the user explaining that the device is not compliant and that it must be fixed, and we send out another email 1 day after which urges the user to make the device compliant in order to keep access to company data protected by Conditional Access.
You can also specify additional recipients of the email by selecting an mail enabled Azure AD group.
Retire the non-compliant device
You can decide to retire a non-compliant device after a certain amount of days (maximum 365). If the device is not compliant, and passes the configured amount of days it will be added to a list of devices in the Admin console considered for retirement. The device isn’t retired until an admin takes explicit action to retire the device.
Assigning to user or device groups
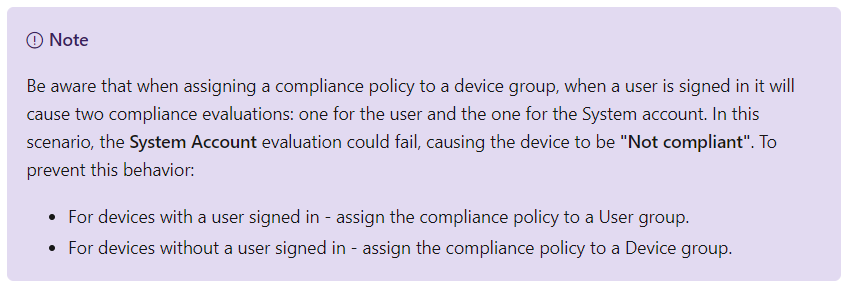
Microsoft has some recommendations when it comes to assigning compliance policies to either user or device groups. Based on my own experience I always try to assign compliance policies to user groups and only use a device group for special circumstances.
I also wrote earlier about when to assign to device groups and when to user groups in the following blog article: “Designing and building your Microsoft Endpoint Manager/Intune environment for Operations“
Using compliance state in your Conditional Access policies
Device compliance plays a crucial part in my Conditional Access baseline policies. I use the device compliance to determine whether I want to allow devices to be able to access my company data hosted in Office 365 or hosted in SaaS based applications.
In my set of Conditional Access policies I use device compliance in several of my policies. As an example below is policy CAD002, which uses an access control that requires a Windows device to be compliant in order to gain access to Office 365.
You can find the latest update for my default set of Conditional Access policies in the Azure AD Conditional Access demystified whitepaper, which can be found here: February 2021 update of the Azure AD Conditional Access demystified whitepaper and workflow cheat sheet.
Designing your Compliance Policies
Based on what we know now, we can design our compliance policies. How to design and leverage compliance policies really depends on your organization. My goal is always to keep it as simple as possible and use one compliance policy for all your scenario’s. Your compliance policy design will be depending on the following questions which you should ask yourself.
- Are all my machines equally configured, or do I have to support a mixture of configurations?
- Am I rolling out my compliance policies in a green field scenario, or do I need to start supporting them in an already existing environment?
- How strictly must device compliance be enforced? Can we allow a grace period giving users the chance to change their compliance state by remediating the device themselves?
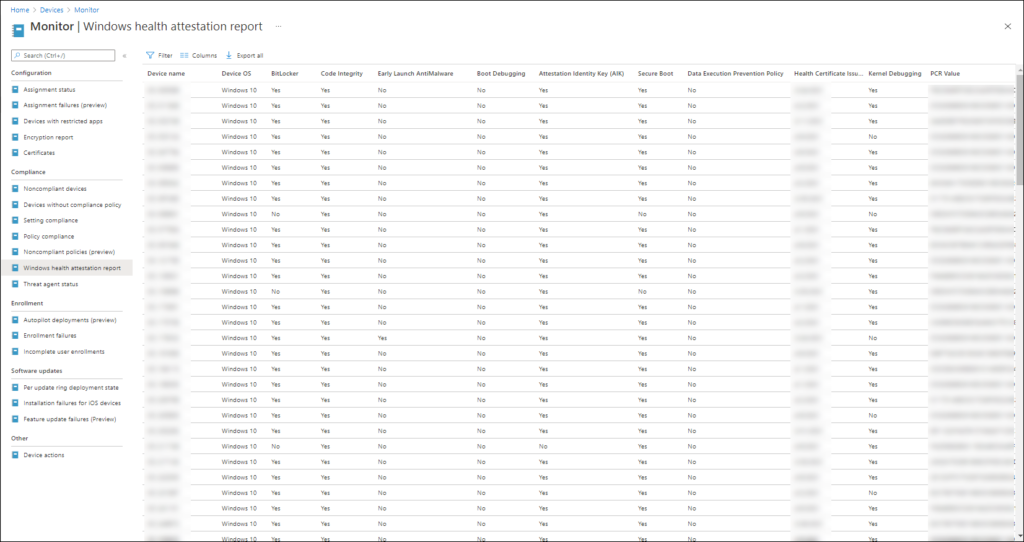
If you want to know the current configuration of your machines which you want to target with a compliance policy the “Windows health attestation report” can help. It will give you an overview of a lot of settings and their current value that you also want configured in your compliance policy. It can give you a good idea on what to expect when you implement your compliance policy/policies.
Some scenario’s I encountered:
I have had some situation where we had to create a compliance policy for Virtual Machines, with some less strict policies related to encryption and availability of a TPM. The challenge here is that since we don’t want to assign our compliance policy to a device group, we had give this compliance policy to the users working on the VMs making the compliance policy also applicable for their physical device. In another scenario we just agreed only to use test accounts on the VMs, where we placed the test accounts in a separate group receiving a specific compliance policy.
In existing environments you might want to create a design where you can use phases to work towards your ultimate compliance policy having all your required settings incorporated. Here it might be handy to create multiple Compliance policy, where specific email notifications are used to inform users why their device is not considered compliant. Depending on the organization and the tech-savviness of the user the user can then make the device compliant themselves, for example by turning on Secure Boot in their UEFI configuration after they received a notification telling them that Secure Boot needs to be enabled.
I also experienced a scenario where we rolled out new Surface Pro devices for every user in the organization, we could use a single compliance policy since all devices were configured the same, and they could all comply with a single compliance policy.
Monitoring your compliance policies
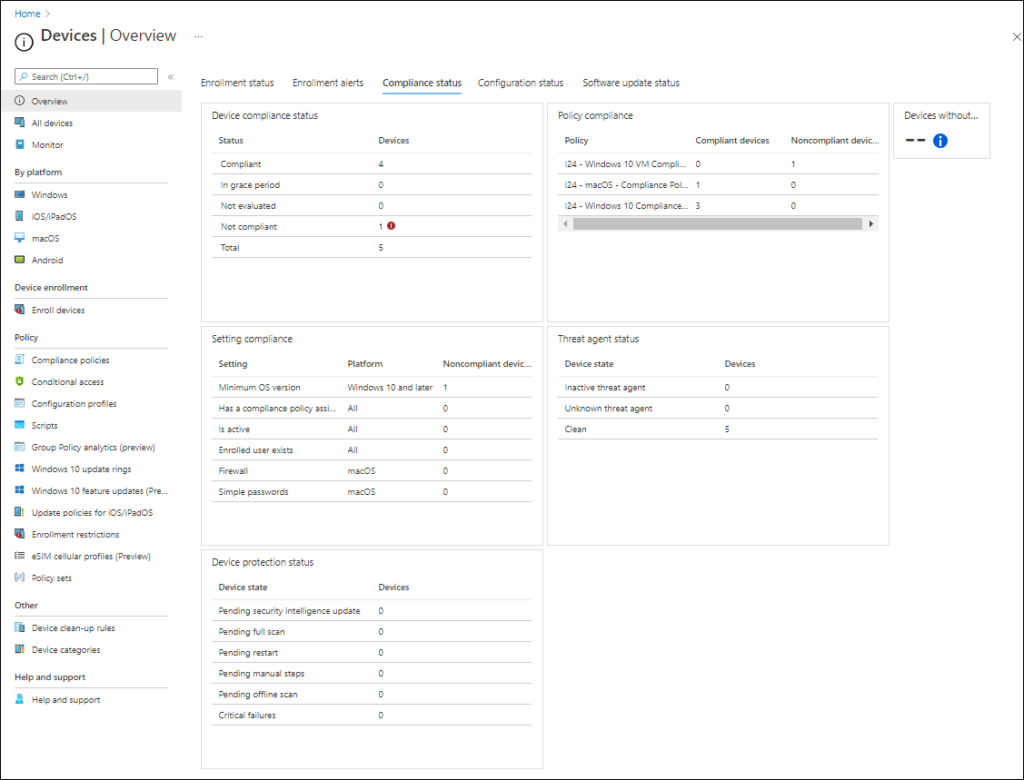
You can monitor the compliance policies in several places within the Microsoft Endpoint Manager admin center.
There is a Compliance status dashboard which can be found under Devices\Overview -> Compliance status tab.
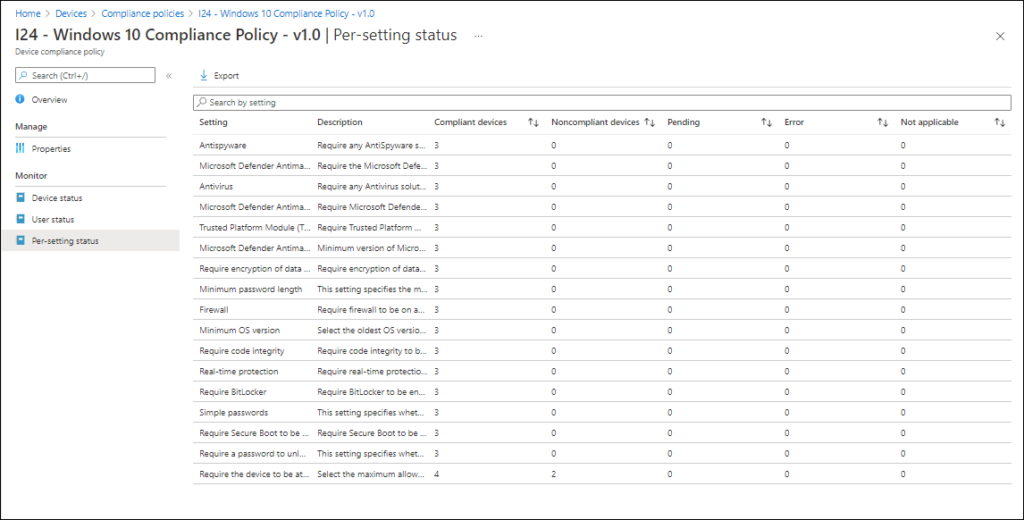
You can also look at the compliance policy status per policy via Devices\Compliance policies -> Select compliance policy. Under monitor you can view Device status, User status and Per-setting status.
Via Devices -> Monitor where there are several Compliance related reports available as well:
- Noncompliant devices
- Devices without compliance policy
- Settings compliance
- Policy compliance
- Noncompliant policies
- Windows health attestation report
- Threat agent status
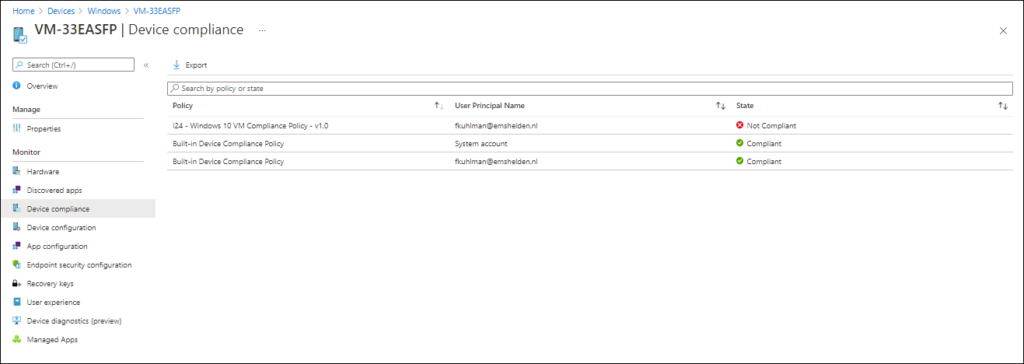
You can also view the device compliance per device under the device compliance settings
Conclusion
Writing and researching the information in order to write this blogpost really made me reconsider some of my previous implemented compliance policies. With all the options available, we cannot create a one size fits all compliance policy which works for every scenario, and therefore you need to tailor your compliance policy/policies to the environment where you want to use them. Sometimes this can be one compliancy policy and sometimes you need more.
I hope this article has given you an idea about the different options you have when defining your compliance policies. When using the compliance policies with conditional access you have to do this right, or else you will get some unexpected results which can cause your conditional access implementation to fail.
References
ConfigMgr – Device compliance documentation
Device compliance policies in Microsoft Intune
Support Tip: Using Device Health Attestation Settings as Part of Your Intune Compliance Policy
How long does it take for devices to get a policy, profile, or app after they are assigned?









Thanks for this great article.
We have tested the endpoint device compliance policy scenario with block condition, Further, we want to enable users to push required changes/updates themselves to access SCO resources. I think this may be the workable solution by connecting Basic Defender, Endpoint Manager and power automate. Could you please advise/need your help to achieve this goal?
thanks for information