This article will continue where we finished in the article I wrote about setting up Apple Business Manager for use with Azure Active Directory. In that article we went through the process of requesting access to Apple Business Manager (ABM), and once access is granted how we can authenticate to ABM using our Azure AD credentials. I also showed how we can automatically provision Azure AD users into ABM making the managed Apple IDs.
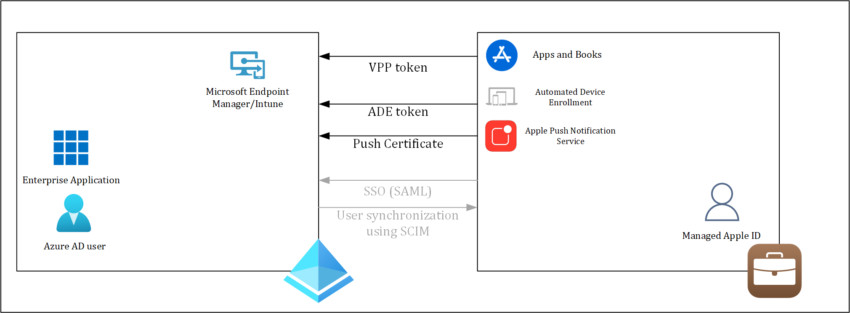
In this article we will connect ABM to Microsoft Endpoint Manager/Intune so that we can enable Automated Device Enrollment (ADE) for Apple devices running iOS/iPadOS and MacOS in our environment. One of the advantages we have by rolling out using ADE is that the device we are rolling out will be put in supervised mode.
Supervision gives your organization more control over the Apple devices, allowing restrictions such as disabling AirDrop or Apple Music, or placing the device in Single App Mode. It also provides additional device configurations and features, so you can do things like silently install apps.
Overview
This article covers the following topics:
- Prerequisites and things to realize before starting
- Configure Apple MDM Push Certificate
- Configure Automate Device Enrollment
- Configure Volume Purchase Program
Prerequisites and things to realize before starting
In this blogpost we will be installing some certificates with a validity of 1 year. Make sure to put a reminder somewhere to renew the token on time. Renewing the tokens must be done with the same Apple ID which you used to acquire the token in the first place, not doing so might cause a lot of work or even re-configuring some configurations.
For the monitoring on the expiration of the Enrollment program token I suggest to have a look at the following article written by Peter van der Woude: Collection of information for monitoring the status of connectors, certificates and tokens
As said, since we need to renew the tokens once in a while and use the same account for that, I advise to use a non-personal account which you can use in case you need to renew the tokens.
Also keep in mind, that activating the VPP can take up to 5 days, in my case it took 1 day but if you are on a strict deadline to deliver your project, keep the 5 days which Apple communicates in mind.
Configure an Apple MDM push certificate
Before you can manage iOS/iPadOS and macOS devices in MEM/Intune you need to configure an Apple MDM Push certificate.
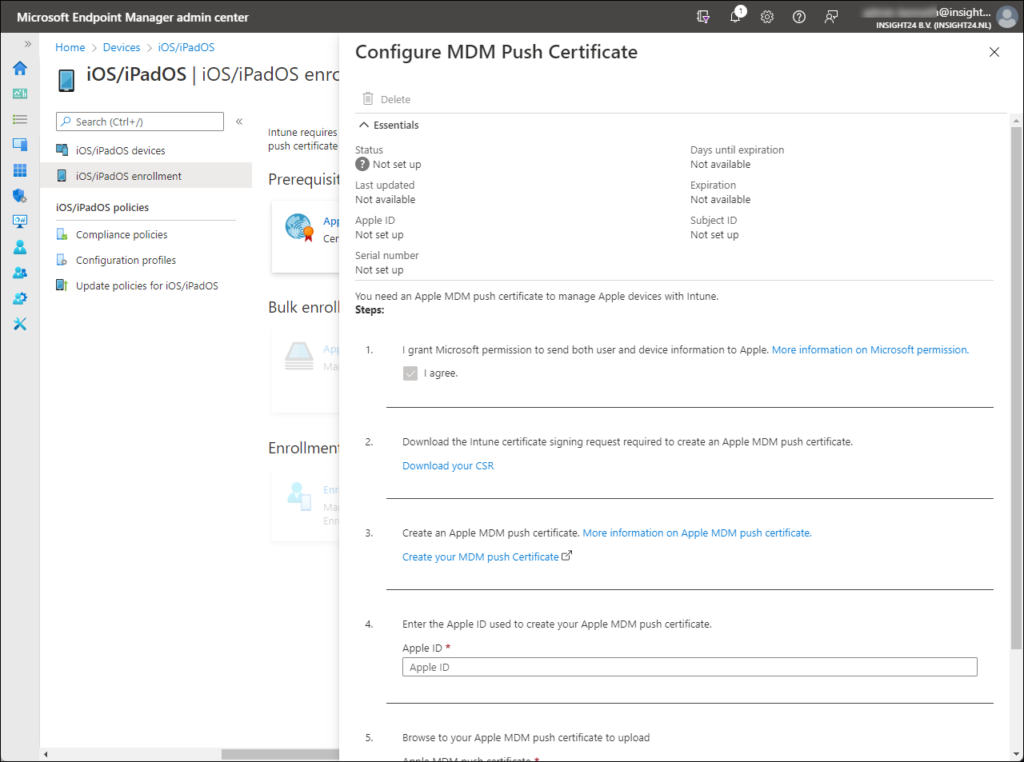
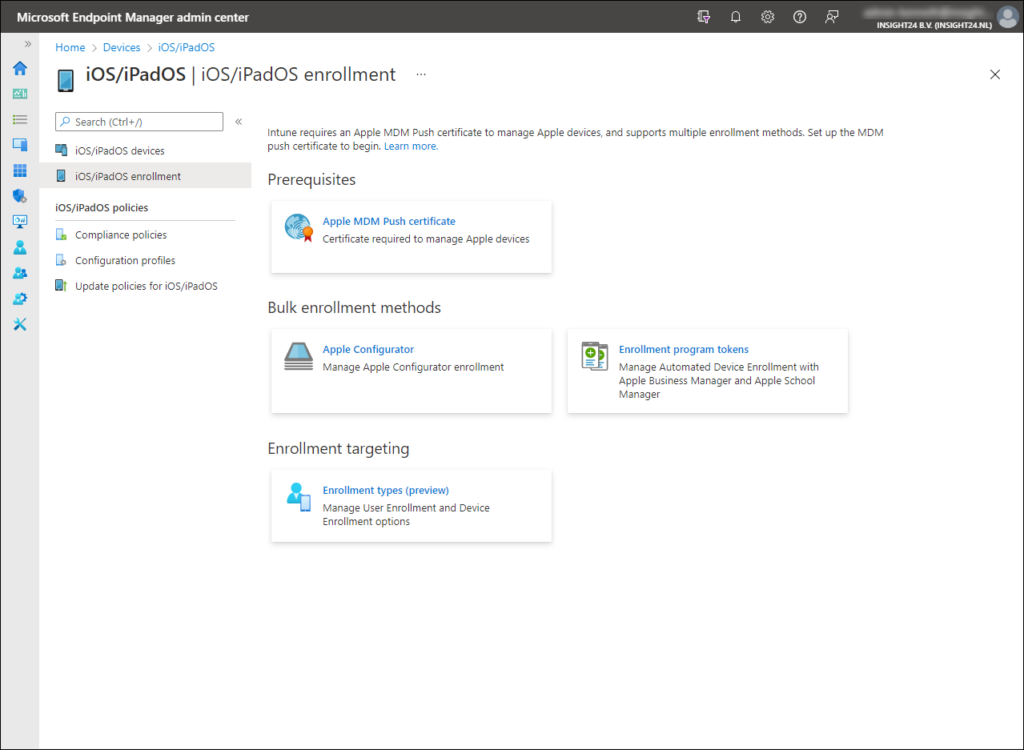
Configuring an Apple MDM Push certificate starts with generating a certificate signing request from the Microsoft Endpoint Manager admin center. You can generate the certificate signing request by going to Devices -> iOS/iPadOS -> iOS/iPadOS enrollment and by selecting the Apple MDM Push certificate tile.
The first thing you need to do, is to grant Microsoft the permission to send both user and device information to Apple. Once done, you can download the Certificate Signing Request file (.csr) from the portal.
Next you can create an Apple MDM push certificate by clicking on the Create your MDM push certificate link, which will open a new browser tab pointing to the Apple Push Certificates Portal. Login to the portal using your Apple ID and provide MFA if requested
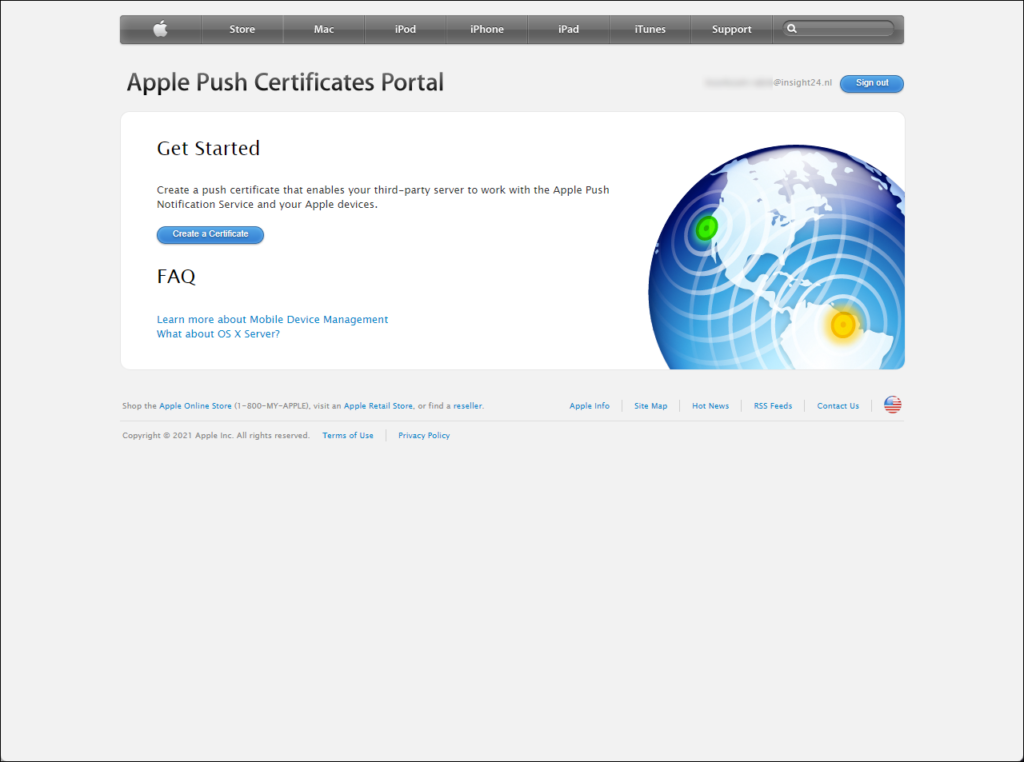
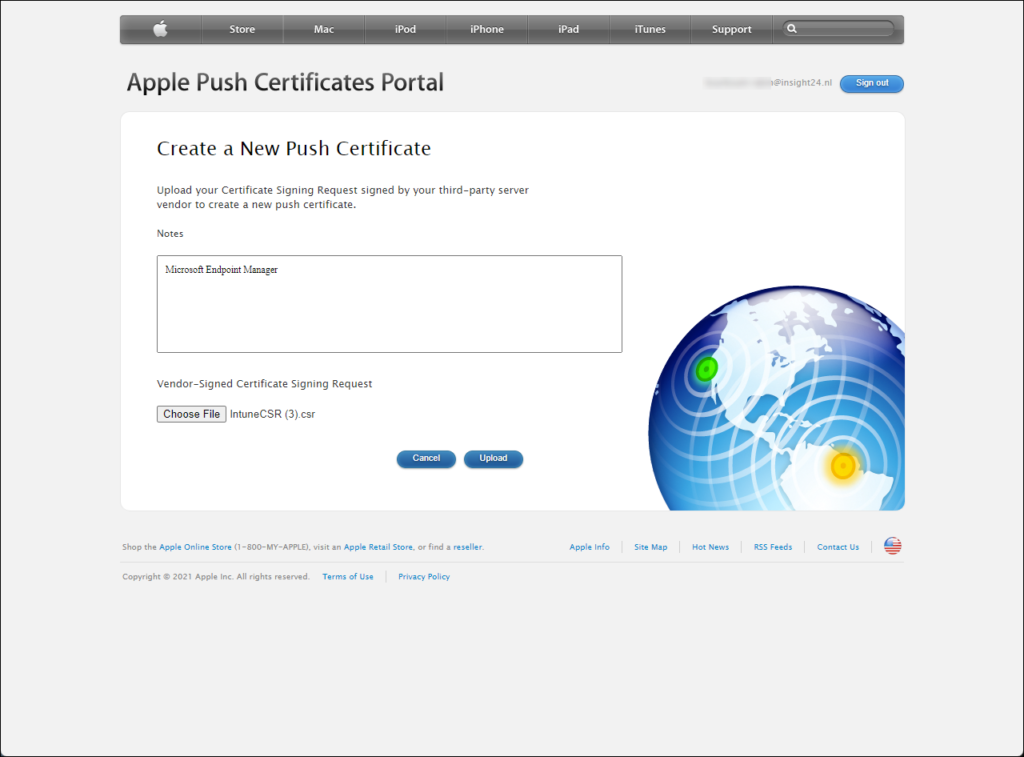
From the portal you can create a certificate by clicking on the Create a certificate button. You then first need to accept the Terms of use before you can Create a new Push certificate. On the Create a New Push Certificate page, you can provide some notes, and upload the .csr file we just downloaded from MEM/Intune.
Keep in mind that the notes can only contain character 0-9, a-z, A-Z with a maximum length of 200.
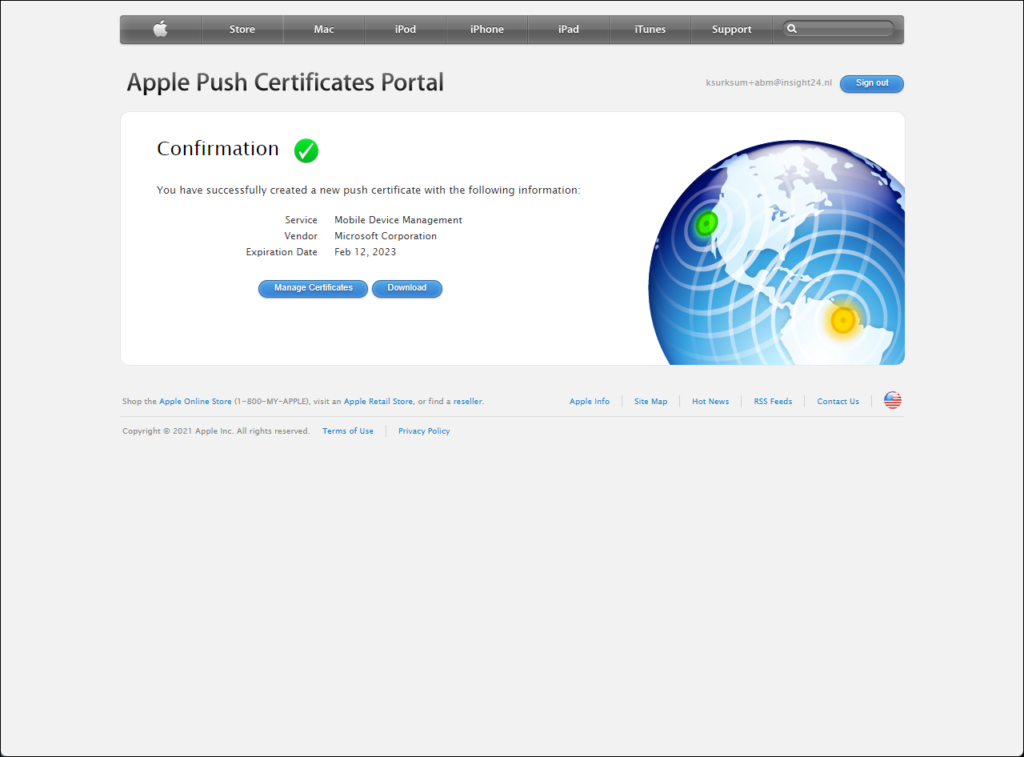
If the files are accepted, you will be offered the option to download a .pem file, which we need later in the Microsoft Endpoint Manager Admin center.
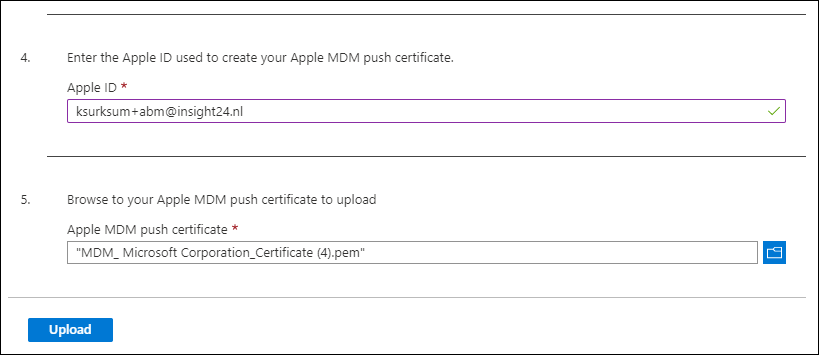
In the last section of the Configure MDM Push Certificate screen we can now provide the Apple ID and upload the Apple MDM Push certificate
Configure an Apple Device Enrollment token
Before you can enroll Apple devices using ADE you need to configure an ADE token. By configuring this token, MEM/Intune can communicate with Apple Business Manager, so that devices from ABM can sync to MEM/Intune and configured Deployment Profiles can be synced from MEM/Intune to ABM. The token has some limitations in terms of maximum enrollment profiles, devices per profile and more, which you should be aware of especially in very large environment.
Download public key
Configuring an ADE token starts with downloading a public key from the Microsoft Endpoint Manager admin center. You can download the public key by going to Devices -> iOS/iPadOS -> iOS/iPadOS enrollment and by selecting the Enrollment program tokens tile.
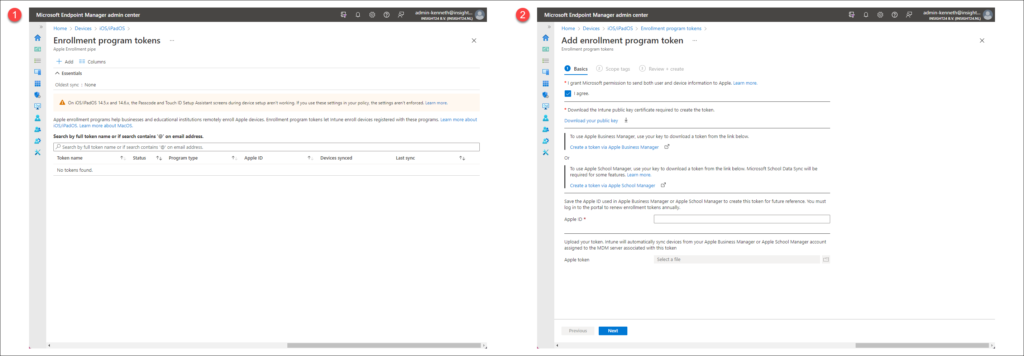
On the Enrollment programs tokens page we can download of the public key, by initiating adding a new enrollment program token. We can start the Add enrollment program token wizard by clicking on the +Add link.
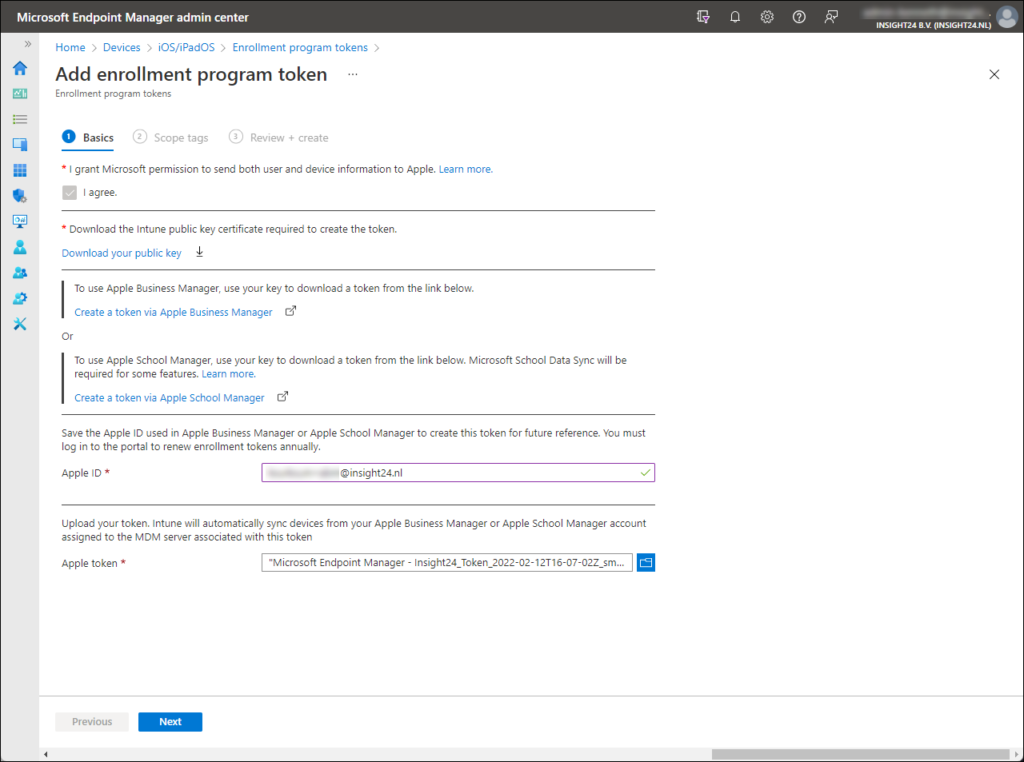
On the Add enrollment program token wizard page, we then first have to agree to the fact that Microsoft will be sending user and device information to Apple. If you do, then can click on the selection box before “I agree”. Doing so will make the option to download a public key available.
Clicking on the Download your public key will initiate a download of a IntuneKey[xx-xx-xx xx_xx].pem file. A Privacy Enhanced Mail (PEM) file is a Base64 encoded DER certificate. A Distinguished Encoding Rules (DER) certificate is a binary encoding for X.509 certificates and private keys.
Once the .pem file is downloaded you can go to the Apple Business Manager portal, make sure while doing so to keep the Add enrollment program token wizard page open, since closing the page can cause the certificate downloaded to become invalidated.
Create ADE token in Apple Business Manager
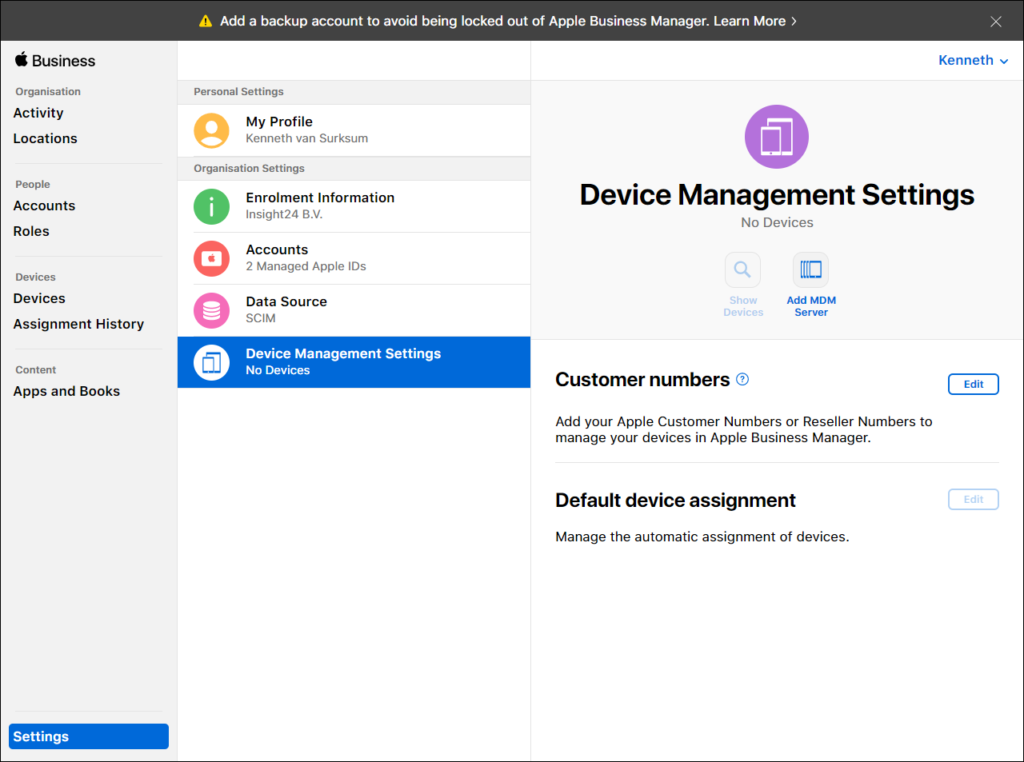
Login to Apple Business Manager and go to the Device Management Settings which can be found under Settings. From here you can start by configuring an Mobile Device Management (MDM) server (MEM/Intune) by clicking on Add MDM Server.
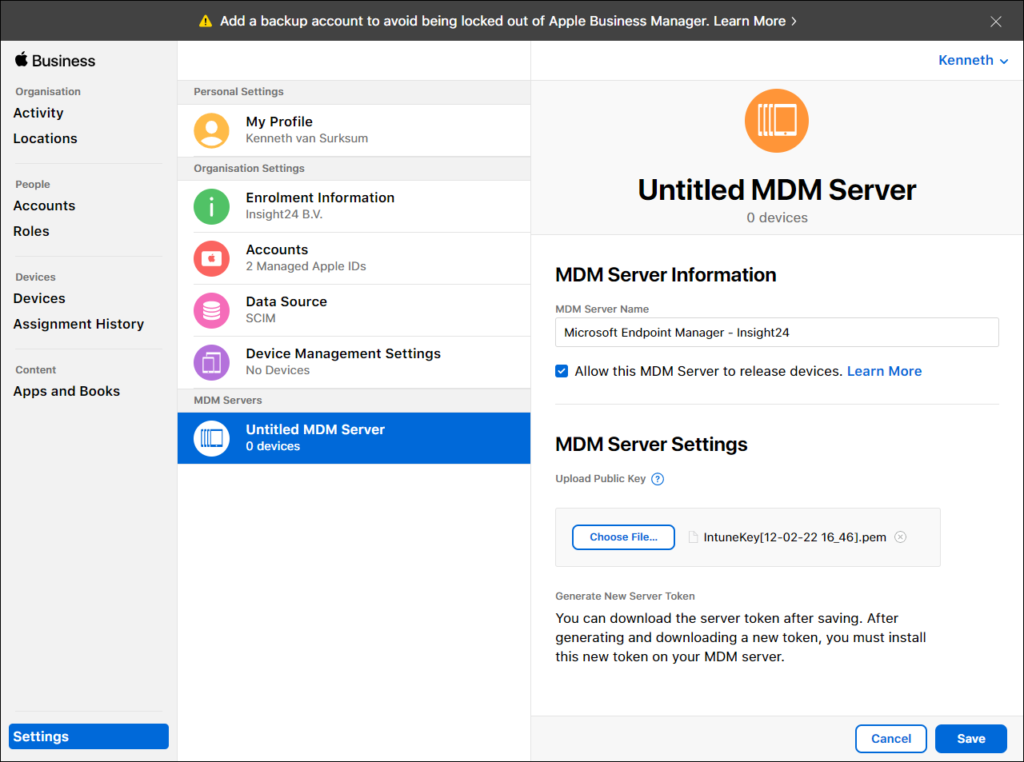
Clicking on Add MDM server will open a new window titled “Untitled MDM server”, and you will also notice that a new section under MDM servers is created with the same name. Under MDM server information you can provide a name for your MDM server. You can choose this name freely but I advise to use something which clearly shows what it does, in my case I use the “Microsoft Endpoint Manager – Insight24” name.
The option to “Allow this MDM server to release devices” is selected by default. Selecting this option means that you will allow MEM/Intune to release a device, which means that you remove the device from ABM.
Under MDM Server settings, you can use the Choose File button to browse to the downloaded PEM file. Once this is done you can click on Save.
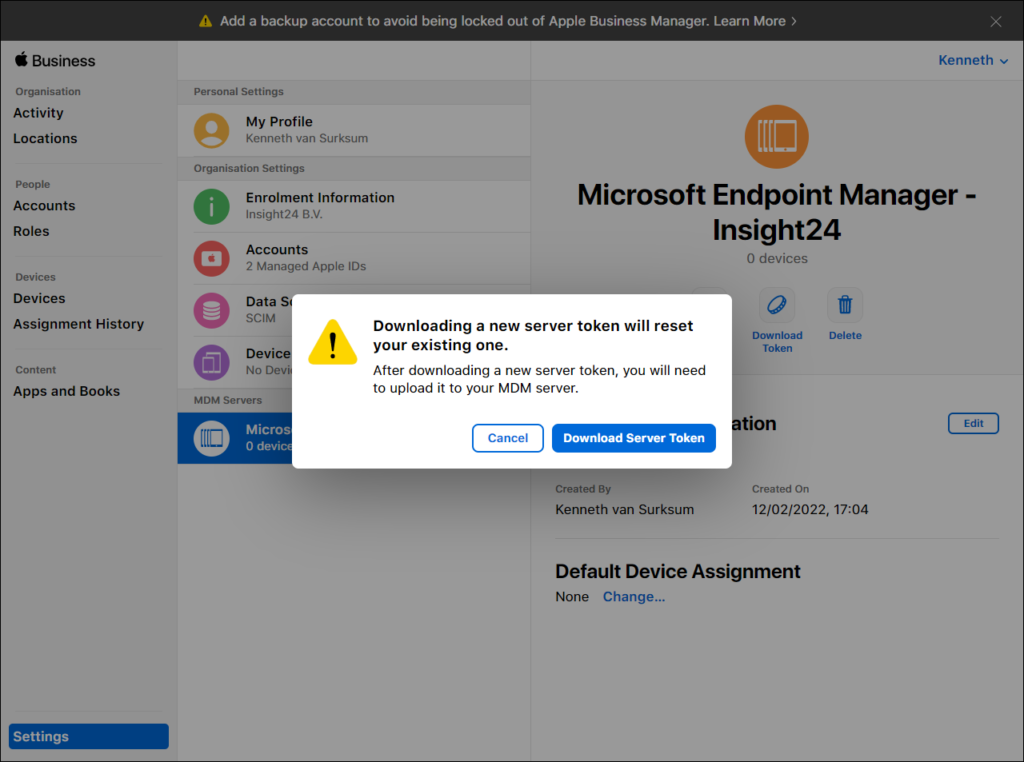
Saving the configuration will update the name of the MDM server to the name provided and gives you the option to download a token. You’ll need this token in MEM/Intune and you can download the token by clicking on the “Download Token” button.
After clicking on Download Server Token you will notice that a .p7m file will be downloaded. Mine is called “Microsoft Endpoint Manager – Insight24_Token_2022-02-12T16-07-02Z_smime.p7m”
Upload the server token in MEM/Intune
Go back to the Add enrollment program token wizard page to finish the wizard. Th first thing you need to do is provide the Apple ID used to generate the token, and next you can upload the .p7m file.
Once this is done you can finish the wizard by Clicking on Next, define Scope tags if applicable and by clicking on Create on the Review + Create section of the wizard.
In 2019 I wrote an article about Implementing RBAC and Scoping in Microsoft Intune, even though the article is old, it gives you a good idea about what scopes are and how you can use them.
Once the enrollment program token is created you will be presented with the following information about this just configured connection between Microsoft Endpoint Manager and Apple Business Manager.
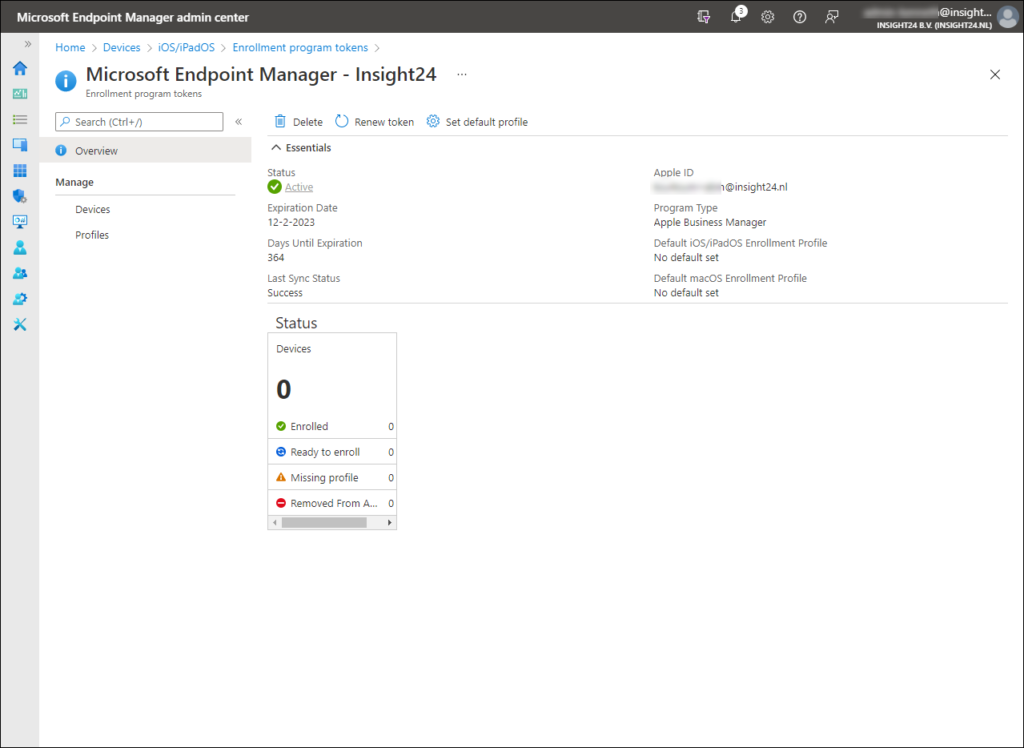
Configure Volume Purchase Program
Before we further configure the Enrollment program token settings, we first need to configure the Apple Volume Purchase Program. The reason for this, is that when creating an enrollment profile, we have some situation where we need to select an already purchased app. In order to do so we first must configure this functionality.
When a managed Apple ID is used, the apps available for that user must be purchased first. This can be done using the Apple Volume Purchase Program (VPP). Licensed apps (and books) bought through VPP can be synchronized to MEM/Intune, just like we can do today with synchronizing Apps from the Windows Store for Business in case of Windows app deployment. Keep in mind that a licensed app is not perse an App that you need to pay for.
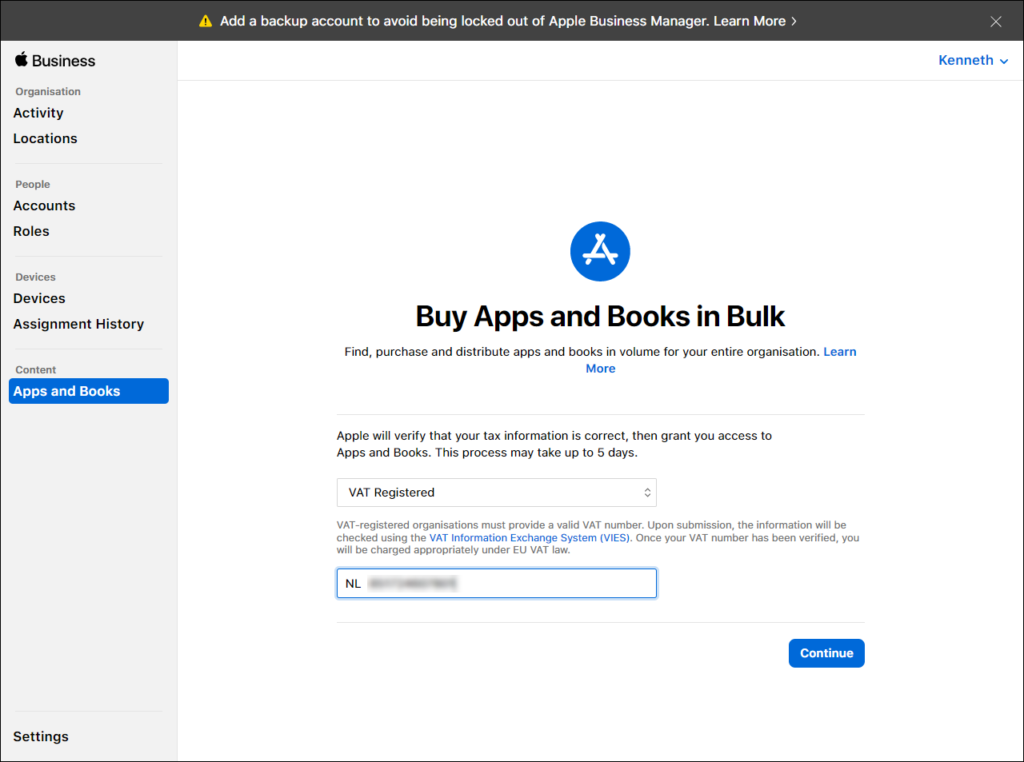
Before you can purchase Apps and Books in bulk, Apple first needs to verify whether your company is Taxable/Not VAT Registered or VAT Registered. This review process may take up to 5 days to complete. You can initiate this process by selecting Apps and Books in the Apple Business Manager portal and by filling in the necessary information requested.
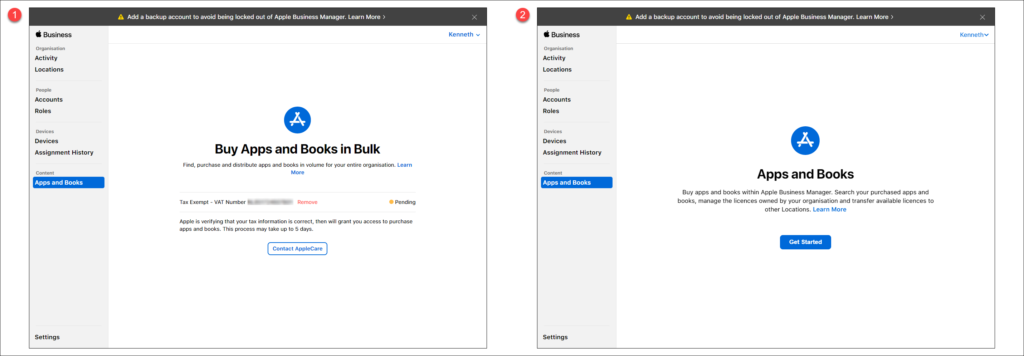
Once finished you can click on Continue after which the verification process is initiated. The first screenshot below says that the review is pending, and the second screenshot shows that Apps and Books are available to use. In my case it took 1 day to have this verification process completed.
Once the VPP verification has taken place we need to agree to the Terms and Conditions first. After that we can search for titles in the Apps and Books section. Below is my result for searching the Company Portal, which strangely results in “Intune-bedrijfsportal” (dutch for Intune Company Portal) being returned. Here you need to define a location and quantity of the licenses you want to buy. Notice that the costs are € 0,00
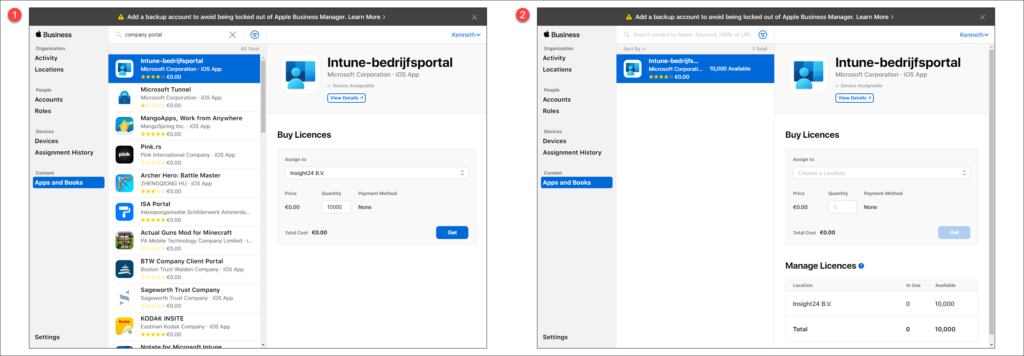
What are locations?
When you sign up for Apple Business Manager, the first location is automatically created and reflects your organization name. You can expand your use of Apple Business Manager to other locations or offices, in that case you can add more locations. You can delete a manually created location as well but before you do, accounts and app and book licenses must be transferred to another location.
Configure Apple VPP Tokens in Microsoft Endpoint Manager
After we have purchased at least one application we can setup the connection between Apple Business Manager and Microsoft Endpoint Manager, so that Apps purchased through VPP become available within MEM as well.
Download VPP Token from Apple Business Manager
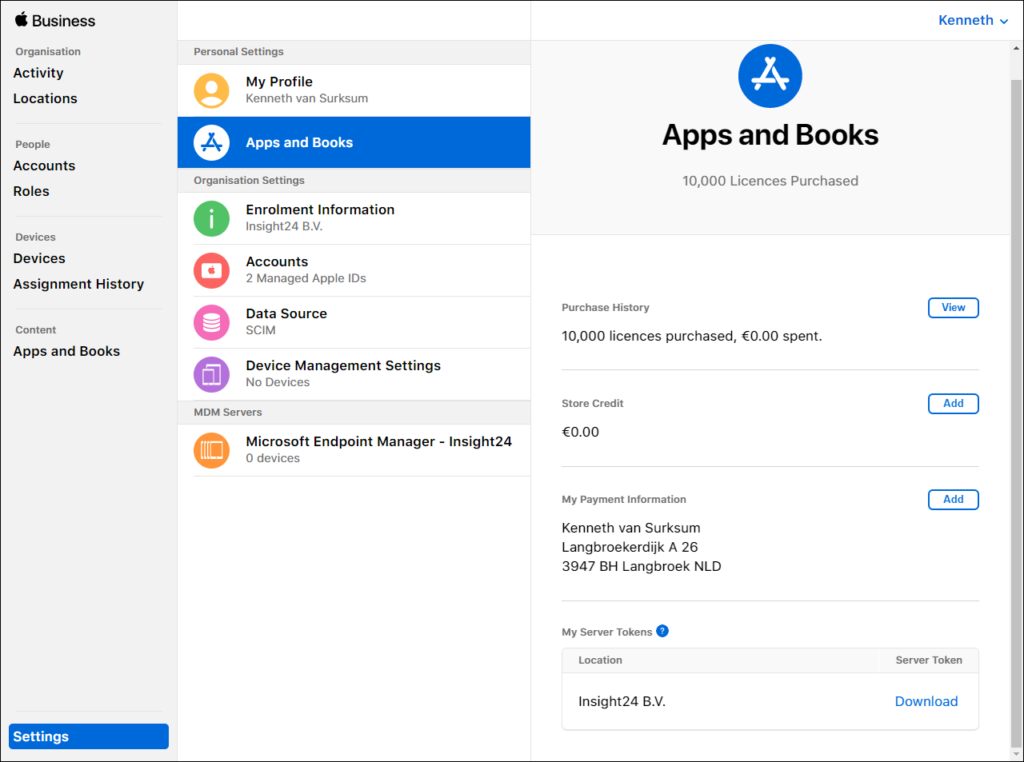
The first thing we need to do, is download a “Server token” from Apple Business Manager. You can download this token by going to Settings -> Apps and Books and by clicking on the Download link next to Location.
Once we have downloaded the token (file in .vpptoken format) we can continue our configuration in Microsoft Endpoint Manager.
Import VPP token in Microsoft Endpoint Manager
In Microsoft Endpoint Manager admin center you can add the Apple VPP token by going to Tenant Admin -> Connectors and tokens -> Apple VPP token. From here you can add the just downloaded token by using the Add token link.
In the basics you can fill in the name of the token, provide the Apple ID with which you downloaded the token (and with which you can extend the token later) and upload the .vpptoken file. Once done click Next to continue to the Settings page.
On the settings page you need to define whether or not you are taking over control from another MDM. This allows you to reassign a currently in use token by another MDM to Microsoft Endpoint Manager.
You also need to supply your Country/Region (Location as explained above), the type of VPP account (Business or Education) and whether you want to allow Automatic app updates. You also need to grant Microsoft the permission to send both user and device information to Apple.
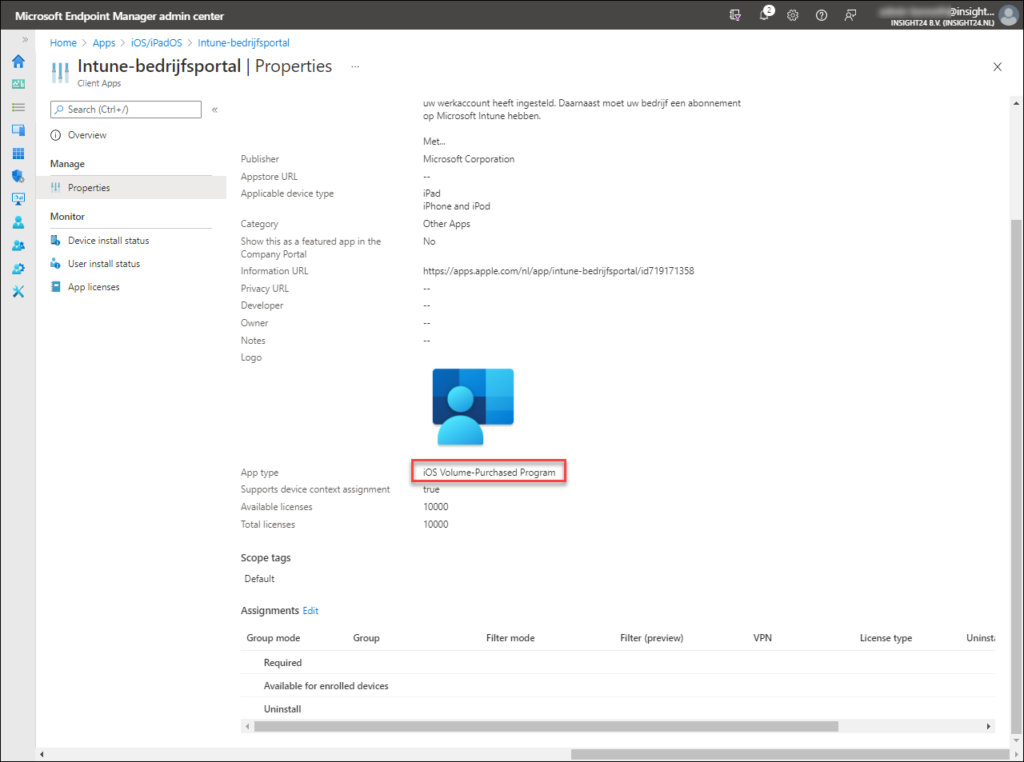
Finish the wizard, and wait for the first synchronization taking place. You will then notice that the purchased app is available within the MEM admin center as well. After which you can assign the App to groups etc..
Conclusion
In this article we configured the integration between Apple Business Manager with Microsoft Endpoint Manager. We configured The Apple MDM push certificate, configured Automated Device Enrollment which allow use to enroll iOS/iPadOS and macOS devices into Azure AD and MEM and last but not least, we configured the integration between Volume Purchase Program and MEM so that purchased Apps are synced to MEM which can then be assigned to users and devices.
In the next articles I will explain how you can link your iOS/iPadOS and macOS devices to Apple Business Manager so that we can leverage the Automated Device Enrollment, I will also explain how to create enrollment profiles for both iOS/iPadOS and macOS and I will also go into more detail on the enrollment process itself.
References
Apple Business Manager User Guide – https://support.apple.com/en-gb/guide/apple-business-manager/welcome/web
Automatically enroll iOS/iPadOS devices by using Apple’s Automated Device Enrollment – https://docs.microsoft.com/en-us/mem/intune/enrollment/device-enrollment-program-enroll-ios
Collection of information for monitoring the status of connectors, certificates and tokens – https://www.petervanderwoude.nl/post/collection-of-information-for-monitoring-the-status-of-connectors-certificates-and-tokens/




2 thoughts on “Connecting Microsoft Endpoint Manager to Apple Business Manager”